
WPF では ComboBox(コンボボックス)と呼ばれる、プログラムの開発ではよく利用されるコントロールが存在します。
プルダウン形式で項目のリストを表示するため、余計なスペースをとることなく画面に配置することが可能です。
この記事では ComboBox の基本的な使い方と実装方法についてサンプルを交えて分かりやすく解説していますので、ぜひ参考にしてみてください。

オススメの参考書
C#の使い方が丁寧に解説しており、「基礎からしっかりと学びたい」という初心者の方にオススメの一冊です。サンプルコードも記載してあり、各章の最後に復習問題があるので理解度を確認しながら読み進めることができます。新しい C# のバージョンにも対応している書籍です。

ComboBox(コンボボックス)とは?

ComboBox とは、入力機能(テキストボックス)とプルダウンメニュー機能(リストボックス)の両方を併せ持ちボックスのコントロールことです。
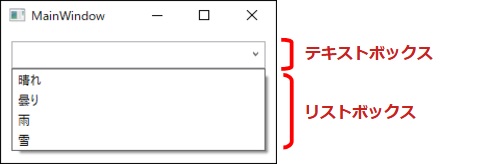
ユーザーは事前に定義されたリスト内の項目を選択するか、テキストボックスに値を入力することができます。
リストボックス部分は通常状態で非表示になっており、ComboBox の右端にある矢印をクリックすることで画面に選択項目が表示されます。
他の UI コントロールの使い方も知りたい方はこの記事をチェック!!

ComboBoxの使い方と実装方法

ComboBox にアイテムを追加するには複数の方法があります。基本的には ItemsSource プロパティにデータバインディングして使うことが多いです。
ComboBox へリストを追加する方法として、大きく分類すると5種類あります。
- XAMLにソースを記述して追加する方法
- ItemsプロパティのAddメソッドで追加する方法
- ItemsSourceプロパティで追加する方法
- データバインディングしてアイテムを追加する方法
- Enum(列挙体)をアイテムとして追加する方法
それぞれの使い方と実装法を確認してみましょう。
XAMLに記述してアイテムを追加する方法
この方法はソースファイルにコードを記述することなく、コンボボックスにアイテムを追加することができます。
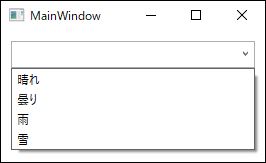
ComboBoxItemのContentプロパティにアイテム名を設定します。この例ではアイテムを4つコンボボックスに追加しています。
<Window x:Class="ComboBoxSample.MainWindow"
        xmlns="http://schemas.microsoft.com/winfx/2006/xaml/presentation"
        xmlns:x="http://schemas.microsoft.com/winfx/2006/xaml"
        xmlns:d="http://schemas.microsoft.com/expression/blend/2008"
        xmlns:mc="http://schemas.openxmlformats.org/markup-compatibility/2006"
        mc:Ignorable="d"
        Title="MainWindow" Height="170" Width="280">
    <Grid>
        <ComboBox Name="cmbSample" Margin="10,10,10,94" IsEditable="True">
            <ComboBoxItem Content="晴れ"/>
            <ComboBoxItem Content="曇り"/>
            <ComboBoxItem Content="雨"/>
            <ComboBoxItem Content="雪"/>
        </ComboBox>
    </Grid>
</Window>
コードビハインドの変更はありません。
using System.Windows;

namespace ComboBoxSample
{
    public partial class MainWindow : Window
    {
        public MainWindow()
        {
            InitializeComponent();
        }
    }
}上記のコードを実行すると次のような結果になります。
通常コンボボックスのテキストボックス部分は入力が無効化されているので、XAML で ComboBox のIsEditableプロパティを true にしています。
ItemsプロパティのAddメソッドで追加する方法
この方法は XAML とソースファイルの両方にソースコードを記述することでアイテムを追加する方法です。
XAML に ComboBox のコントロールを配置するコードを記述します。
<Window x:Class="ComboBoxSample.MainWindow"
        xmlns="http://schemas.microsoft.com/winfx/2006/xaml/presentation"
        xmlns:x="http://schemas.microsoft.com/winfx/2006/xaml"
        xmlns:d="http://schemas.microsoft.com/expression/blend/2008"
        xmlns:mc="http://schemas.openxmlformats.org/markup-compatibility/2006"
        mc:Ignorable="d"
        Title="MainWindow" Height="170" Width="280">
    <Grid>
        <ComboBox Name="cmbSample" Margin="10,10,10,94" IsEditable="True"/>
    </Grid>
</Window>
コードビハインドにはコンボボックスのアイテムを追加します。
using System.Windows;

namespace ComboBoxSample
{
    public partial class MainWindow : Window
    {
        public MainWindow()
        {
            InitializeComponent();

            cmbSample.Items.Add("晴れ");
            cmbSample.Items.Add("曇り");
            cmbSample.Items.Add("雨");
            cmbSample.Items.Add("雪");
        }
    }
}
ここでは、コンストラクタでコンボボックスに4つのアイテムを追加しています。
上記のコードを実行すると次のような結果になります。XAML でアイテムを追加した場合と同じ結果です。
ItemsSourceプロパティでアイテムを追加する方法
コードビハインドのソースファイルに配列やList<T>などのコレクションの要素をItemsSourceプロパティに直接データを設定します。
XAML は先ほどと同じ記述です。
<Window x:Class="ComboBoxSample.MainWindow"
        xmlns="http://schemas.microsoft.com/winfx/2006/xaml/presentation"
        xmlns:x="http://schemas.microsoft.com/winfx/2006/xaml"
        xmlns:d="http://schemas.microsoft.com/expression/blend/2008"
        xmlns:mc="http://schemas.openxmlformats.org/markup-compatibility/2006"
        mc:Ignorable="d"
        Title="MainWindow" Height="170" Width="280">
    <Grid>
        <ComboBox Name="cmbSample" Margin="10,10,10,94" IsEditable="True"/>
    </Grid>
</Window>
コードビハインドには次のように変更します。
using System.Windows;

namespace ComboBoxSample
{
    public partial class MainWindow : Window
    {
        public MainWindow()
        {
            InitializeComponent();

            cmbSample.ItemsSource = new string[]
            {
                "晴れ",
                "曇り",
                "雨",
                "雪"
            };
        }
    }
}上記のコードを実行すると次のような結果になります。
データバインディングしてアイテムを追加する方法(#1)
ここからはデータバインディングする方法です。
まず、データバインディングする上でコンボボックスの重要なプロパティを紹介します。これらのプロパティを使って選択されているデータを取得したり、コレクションを設定したりします。
| プロパティ名 | 説明 |
| ItemsSource | 選択可能なデータのコレクションをバインドするためのプロパティである。基本的にObservableCollection型を使用する。 |
| SelectedItem | ItemsSource のうち、現在選択されているデータである。 |
| SelectedValue | ItemsSource のうち、現在選択されているデータの値である。 |
| SelectedValuePath | SelectedValue にバインドするプロパティ名である。 |
| DisplayMemberPath | 表示するデータの名称である。 |
もっとも簡単なバインドの方法が次の通りです。
ItemsSourceプロパティに表示したいデータのコレクションをバインドします。SelectedItemプロパティに選択した項目をバインドします。
<Window
    x:Class="ComboBoxSample.MainWindow"
    xmlns="http://schemas.microsoft.com/winfx/2006/xaml/presentation"
    xmlns:x="http://schemas.microsoft.com/winfx/2006/xaml"
    xmlns:d="http://schemas.microsoft.com/expression/blend/2008"
    xmlns:mc="http://schemas.openxmlformats.org/markup-compatibility/2006"
    Title="MainWindow"
    Width="280"
    Height="170"
    mc:Ignorable="d">
    <Grid>
        <ComboBox
            Name="cmbSample"
            Margin="10,10,10,94"
            IsEditable="True"
            ItemsSource="{Binding Weathers}"
            SelectedItem="{Binding SelectItem}" />
    </Grid>
</Window>コードビハインドではDataContextプロパティにViewModelのオブジェクトを渡します。
using System.Windows;

namespace ComboBoxSample
{
    public partial class MainWindow : Window
    {
        public MainWindow()
        {
            InitializeComponent();
            DataContext = new ViewModel();
        }
    }
}
ViewModelではコンボボックスのアイテムを追加します。
class ViewModel
{
    public ObservableCollection Weathers { get; private set; }

    public ViewModel()
    {
        Weathers = new ObservableCollection
        {
            "晴れ",
            "曇り",
            "雨",
            "雪"
        };
    }

    public string SelectItem { get; set; }
}上記のコードを実行すると次のような結果になります。
データバインディングしてアイテムを追加する方法(#2)
次は任意のクラスを作成して、そのリストをItemsSourceプロパティに設定する方法です。先ほどは表示する文字列だけ設定しましたが、Idと表示する文字列をセットにして、ItemsSourceプロパティに設定します。
ここで重要なのはSelectedValuePathプロパティとDisplayMemberPathプロパティを使用するということです。
SelectedValuePathは、選択された時にSelectedValueに渡す項目を設定します。
<Window
    x:Class="ComboBoxSample.MainWindow"
    xmlns="http://schemas.microsoft.com/winfx/2006/xaml/presentation"
    xmlns:x="http://schemas.microsoft.com/winfx/2006/xaml"
    xmlns:d="http://schemas.microsoft.com/expression/blend/2008"
    xmlns:mc="http://schemas.openxmlformats.org/markup-compatibility/2006"
    Title="MainWindow"
    Width="280"
    Height="170"
    mc:Ignorable="d">
    <Grid>
        <ComboBox
            Name="cmbSample"
            Margin="10,10,10,94"
            IsEditable="True"
            SelectedValuePath="Id"
            DisplayMemberPath="Name"
            ItemsSource="{Binding Weathers}"
            SelectedValue="{Binding SelectItemValue}"/>
    </Grid>
</Window>
using System.Windows;
namespace ComboBoxSample
{
public partial class MainWindow : Window
{
public MainWindow()
{
InitializeComponent();
DataContext = new ViZViewModelクラス
class ViewModel
{
    public ObservableCollection Weathers { get; private set; }

    public ViewModel()
    {
        Weathers = new ObservableCollection
        {
            new Weather( 1 , "晴れ"),
            new Weather( 2, "曇り"),
            new Weather( 3, "雨"),
            new Weather( 4, "雪")
        };
    }

    public string SelectItemValue { get; set; }
}

public class Weather
{
    public Weather(int id, string name)
    {
        Id = id;
        Name = name;
    }

    public int Id { get; set; }
    public string Name { get; set; }
}上記のコードを実行すると次のような結果になります。
ViewModelをバインディングしたコンボボックス内部の動作を確認してみます。ドロップダウンリストから項目を選択した場合、値が内部でどのように変化しているかを可視化して動作を確認します。
ボタンのクリックイベントで各プロパティの値を取得して、メッセージボックスを表示するようにコードを追加します。
<Window
    x:Class="ComboBoxSample.MainWindow"
    xmlns="http://schemas.microsoft.com/winfx/2006/xaml/presentation"
    xmlns:x="http://schemas.microsoft.com/winfx/2006/xaml"
    xmlns:d="http://schemas.microsoft.com/expression/blend/2008"
    xmlns:mc="http://schemas.openxmlformats.org/markup-compatibility/2006"
    Title="MainWindow"
    Width="280"
    Height="170"
    mc:Ignorable="d">
    <Grid>
        <ComboBox
            Name="cmbSample"
            Margin="10,10,10,94"
            DisplayMemberPath="Name"
            IsEditable="True"
            ItemsSource="{Binding Weathers}"
            SelectedValue="{Binding SelectItemValue}"
            SelectedValuePath="Id" />
        <Button
            x:Name="btnCheck"
            Width="95"
            Height="30"
            Margin="10,0,0,10"
            Click="btnCheck_Click"
            HorizontalAlignment="Left"
            VerticalAlignment="Bottom"
            Content="確認" />
    </Grid>
</Window>
using System.Text;
using System.Windows;
namespace ComboBoxSample
{
public partial class MainWindow : Window
{
public MainWindow()
{
InitializeComponent();
DataContext = new ViewModel();
}
private void btnCheck_Click(object sender, RoutedEventArgs e)
{
var item = cmbSample.SelectedItem as Weather;
if (item is null) return;
var sb = new StringBuilder();
sb.AppendLine("SelectedIndex:" + cmbSample.SelectedIndex);
sb.AppendLine("SelectedValue:" + cmbSample.SelectedValue);
sb.AppendLine("Text:" + cmbSample.Text);
sb.AppendLine("Id:" + item.Id);
sb.AppendLine("Name:" + item.Name);
MessageBox.Show(sb.ToString());
}
}
}ViewModelの更新はありません。上記のコードを実行してプロパティの値を確認してみましょう。
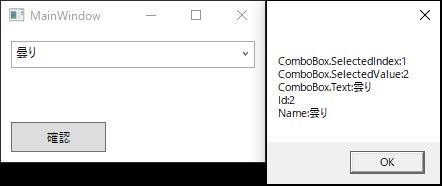
上の図では、「雲り」をコンボボックスのドロップダウンリストから選択しています。「曇り」はリストの2番目に存在します。
メッセージボックスに表示された内容を簡単に解説します。
- SelectedIndexには「1」が設定されます。要素のインデックス番号0から開始されるので、リストの2番目にある「曇り」はインデックス番号が「1」になります。
- SelectedValueには「2」が設定されます。これはSelectedValuePathで「Id」をバインドしているためです。
- Textには「曇り」が設定されます。これはDisplayMemberPathに「曇り」を設定しているためです。
このようにIdと表示する文字列のセットでコンボボックスを制御することが可能です。
Enum(列挙体)をアイテムとして追加する方法(#1)
続いて enum のデータをコンボボックスに表示する方法を紹介します。2パターンの実装方法があるので用途に応じて使い分けが必要です。
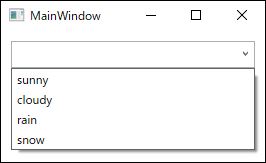
まずは、コンボボックスに enum の定義名をそのまま選択項目に追加してリストを作成します。
EnumのGetValues プロパティで Enum のリストを作成し、そのデータを ItemsSource プロパティにバインドします。
<Window
    x:Class="ComboBoxSample.MainWindow"
    xmlns="http://schemas.microsoft.com/winfx/2006/xaml/presentation"
    xmlns:x="http://schemas.microsoft.com/winfx/2006/xaml"
    xmlns:d="http://schemas.microsoft.com/expression/blend/2008"
    xmlns:mc="http://schemas.openxmlformats.org/markup-compatibility/2006"
    Title="MainWindow"
    Width="280"
    Height="170"
    mc:Ignorable="d">
    <Grid>
        <ComboBox
            Name="cmbSample"
            Margin="10,10,10,94"
            IsEditable="True"
            ItemsSource="{Binding WeatherEnums}" />
    </Grid>
</Window>
using System.Windows;
namespace ComboBoxSample
{
public enum Weather
{
sunny,
cloudy,
rain,
snow
}
public partial class MainWindow : Window
{
public MainWindow()
{
InitializeComponent();
DataContext = new ViewModel();
}
}
}ViewModelクラス
using System;

namespace ComboBoxSample
{
    class ViewModel
    {
        // Enum配列のプロパティ
        public Weather[] WeatherEnums { get; set; }

        public ViewModel()
        {
            WeatherEnums = (Weather[])Enum.GetValues(typeof(Weather));
        }
    }
}上記のコードを実行してみましょう。
Enum(列挙体)をアイテムとして追加する方法(#2)
Enum と表示する文字列がセットになったリストを作成します。ここでは Dictionary 型を使用して「Key」と「value」のペアを作り、ItemsSource プロパティにバインドします。
ここで重要なのは SelectedValuePath プロパティに Dictionary の「key」、DisplayMemberPath プロパティにDictionary の「value」を設定するということです。この記述を忘れてしまうとコンボボックスのドロップダウンリストに表示される値がおかしくなります。一度、どのような表示結果になるかプロパティを設定せずに動かしてみてください。
<Window
    x:Class="ComboBoxSample.MainWindow"
    xmlns="http://schemas.microsoft.com/winfx/2006/xaml/presentation"
    xmlns:x="http://schemas.microsoft.com/winfx/2006/xaml"
    xmlns:d="http://schemas.microsoft.com/expression/blend/2008"
    xmlns:mc="http://schemas.openxmlformats.org/markup-compatibility/2006"
    Title="MainWindow"
    Width="280"
    Height="170"
    mc:Ignorable="d">
    <Grid>
        <ComboBox
            Name="cmbSample"
            Margin="10,10,10,94"
            DisplayMemberPath="Value"
            IsEditable="True"
            ItemsSource="{Binding WeatherNames}"
            SelectedValuePath="Key" />
    </Grid>
</Window>
using System.Windows;
namespace ComboBoxSample
{
public enum Weather
{
sunny,
cloudy,
rain,
snow
}
public partial class MainWindow : Window
{
public MainWindow()
{
InitializeComponent();
DataContext = new ViewModel();
}
}
}ViewModelクラス
using System;

namespace ComboBoxSample
{
    class ViewModel
    {
        // Enum配列のプロパティ
        public Dictionary<Weather, string> WeatherNames { get; set; }

        public ViewModel()
        {
            WeatherNames = new Dictionary<Weather, string>
            {
                [Weather.sunny] = "晴れ",
                [Weather.cloudy] = "曇り",
                [Weather.rain] = "雨",
                [Weather.snow] = "雪",
            };
        }
    }
}上記のコードを実行すると次のような結果になります。
まとめ

この記事では WPF のコントロールの1つである ComboBox の使い方と実装方法について紹介しました。
記述パターンはいくつかありますので、プログラムの要件にあった実装方法で書くようにしましょう。
- XAMLにソースを記述して追加する方法
- ItemsプロパティのAddメソッドで追加する方法
- ItemsSourceプロパティで追加する方法
- データバインディングしてアイテムを追加する方法
- Enum(列挙体)をアイテムとして追加する方法

以上、最後まで読んでいただきありがとうございました。