
WPF の Button の使い方を知りたい。。。
パソコンやスマホで Web サイトやアプリを閲覧・操作する際に必ず存在するのが「ボタン」です。
この無くてはならないボタンを「C# の WPF でどうやって使うのか」をこの記事ではまとめています。
この記事に記載しているのは基礎的な内容を紹介しています。
ぜひ最後まで読んで参考にしてみてください。
オススメの参考書
C#の使い方が丁寧に解説しており、「基礎からしっかりと学びたい」という初心者の方にオススメの一冊です。サンプルコードも記載してあり、各章の最後に復習問題があるので理解度を確認しながら読み進めることができます。新しい C# のバージョンにも対応している書籍です。

Button(ボタン)とは?

Button(ボタン)とは、アプリケーションの画面上に表示される四角形をしたスイッチのことです。
このスイッチを押すと、イベントが発生して何らかのアクションを起こすことができます。立体感のあるグラフィックで表現されており、ユーザーがボタンを押したことが直観的に分かるようなデザインになっています。
C# の WPF ではボタンは標準搭載されているコントロールです。
デザイナーのツールボックスから「Button」を選択することで簡単に画面へ追加することが可能です。
このボタンを使ったWPFのサンプルを具体的に確認してみましょう。
他の UI コントロールの使い方も知りたい方はこの記事をチェック!!
Buttonの使い方を紹介

まずはアプリケーションの画面に「Button」を追加しましょう。
Buttonを追加する方法は2通りあります。
- ツールボックスを展開してウィンドウの中にドラッグ&ドロップして配置する。
- XAMLコードに直接記述して配置する。
ここでは②の方法で追加をします。
Buttonを画面に表示する
ウィンドウにボタンを表示するには、<Button/>を XAML に記述します。
簡単な例をまず紹介します。
<Window
    x:Class="Sample.MainWindow"
    xmlns="http://schemas.microsoft.com/winfx/2006/xaml/presentation"
    xmlns:x="http://schemas.microsoft.com/winfx/2006/xaml"
    xmlns:d="http://schemas.microsoft.com/expression/blend/2008"
    xmlns:mc="http://schemas.openxmlformats.org/markup-compatibility/2006"
    Title="MainWindow"
    Width="300"
    Height="100"
    mc:Ignorable="d">
    <DockPanel Margin="15">
        <Button Content="ボタン"/>
    </DockPanel>
</Window>
このコードを実行した画面は次の通りです。
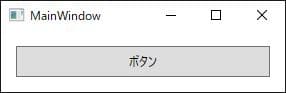
ボタンのテキストを表示する場合は、Contentプロパティに表示したい文字列を入力します。
| プロパティ名 | 内容 |
|---|---|
| Content | ContentControl のコンテンツを取得または設定します。文字列以外にオブジェクトを設定することができます。 |
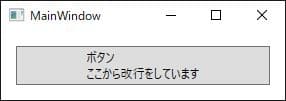
Contentプロパティにテキストを改行して表示する
XAML コードで改行を表示したい場合は、特殊文字列の「
」を使用します。
WPF は Windows フォームと同じように(改行をしたい所にカーソルを合わせて Enter キーを押す)改行することはできません。
Windows フォームを使っていた方は不便に感じるかもしれませんが、特殊文字列を使用して改行をしましょう。
<Window
    x:Class="Sample.MainWindow"
    xmlns="http://schemas.microsoft.com/winfx/2006/xaml/presentation"
    xmlns:x="http://schemas.microsoft.com/winfx/2006/xaml"
    xmlns:d="http://schemas.microsoft.com/expression/blend/2008"
    xmlns:mc="http://schemas.openxmlformats.org/markup-compatibility/2006"
    Title="MainWindow"
    Width="300"
    Height="100"
    mc:Ignorable="d">
    <DockPanel Margin="15">
        <Button Content="ボタン
ここから改行をしています"/>
    </DockPanel>
</Window>
このコードを実行した画面は次の通りです。
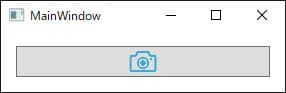
Buttonに画像を表示する
ツールバーなどではボタンの幅を確保できないので、ボタンにアイコンを表示します。
ユーザーがそのアイコンを見ただけで、どんな機能があるのか予想ができるようにしています。
アイコンを表示するには、Button の子要素として Image クラスを記述することでアイコン(画像)付きのボタンが作成できます。
<Window
    x:Class="Sample.MainWindow"
    xmlns="http://schemas.microsoft.com/winfx/2006/xaml/presentation"
    xmlns:x="http://schemas.microsoft.com/winfx/2006/xaml"
    xmlns:d="http://schemas.microsoft.com/expression/blend/2008"
    xmlns:mc="http://schemas.openxmlformats.org/markup-compatibility/2006"
    Title="MainWindow"
    Width="300"
    Height="100"
    mc:Ignorable="d">
    <Grid Margin="15">
        <Button>
            <Image Source="Icons/Camera.png" />
        </Button>
    </Grid>
</Window>
このコードを実行した画面は次の通りです。
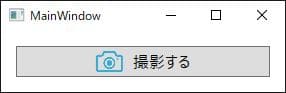
Buttonに画像と文字列を表示する
今度は画像のみではなく、画像と文字列を両方表示する方法です。
Button の Content エリアの中に、StackPanel を設置して、Image クラスと TextBlock クラスを子要素として追加してあげます。
<Window
    x:Class="Sample.MainWindow"
    xmlns="http://schemas.microsoft.com/winfx/2006/xaml/presentation"
    xmlns:x="http://schemas.microsoft.com/winfx/2006/xaml"
    xmlns:d="http://schemas.microsoft.com/expression/blend/2008"
    xmlns:mc="http://schemas.openxmlformats.org/markup-compatibility/2006"
    Title="MainWindow"
    Width="300"
    Height="100"
    mc:Ignorable="d">
    <Grid Margin="15">
        <Button>
            <StackPanel Orientation="Horizontal">
                <Image Source="Icons/Camera.png" />
                <TextBlock
                    Margin="10,0,0,0"
                    VerticalAlignment="Center"
                    FontSize="16"
                    Text="撮影する" />
            </StackPanel>
        </Button>
    </Grid>
</Window>
このコードを実行した画面は次の通りです。
クリックイベントを設定する
ボタンをクリックしてイベントが発生するように設定をしましょう。上記で説明した設定では、クリックしても何も起きない状態です。
簡単なサンプルとして、ボタンをクリックしたらメッセージボックスが表示されるように実装をします。
Button タグの中に「Cllick」と入力して、新しいイベントハンドラーを作成します。
<Window
    x:Class="Sample.MainWindow"
    xmlns="http://schemas.microsoft.com/winfx/2006/xaml/presentation"
    xmlns:x="http://schemas.microsoft.com/winfx/2006/xaml"
    xmlns:d="http://schemas.microsoft.com/expression/blend/2008"
    xmlns:mc="http://schemas.openxmlformats.org/markup-compatibility/2006"
    Title="MainWindow"
    Width="300"
    Height="100"
    mc:Ignorable="d">
    <Grid Margin="15">
        <Button Tag="撮影するボタン" Click="btn_Click">
            <StackPanel Orientation="Horizontal">
                <Image Source="Icons/Camera.png" />
                <TextBlock
                    Margin="10,0,0,0"
                    VerticalAlignment="Center"
                    FontSize="16"
                    Text="撮影する" />
            </StackPanel>
        </Button>
    </Grid>
</Window>コードビハインド側には、ボタンのイベントである「btn_Click」が生成されているので、ここに処理を記述します。
どのボタンが押されたか(1つしかありませんが)をメッセージボックスに表示します。
using System.Windows;
using System.Windows.Controls;

namespace Sample
{
    public partial class MainWindow : Window
    {
        public MainWindow()
        {
            InitializeComponent();
        }

        private void btn_Click(object sender, RoutedEventArgs e)
        {
            var button = sender as Button;
            MessageBox.Show($"{button.Tag}がクリックされました。");
        }
    }
}
このコードを実行した画面は次の通りです。

Commandで処理をする
WPF ではアプリケーションプログラムが頻繁に遭遇する一般的な処理をコマンドとして定義します。
コマンドは自分で定義するか、よく利用される処理はあらかじめ ApplicationCommands というクラスに定義されています。
上記の条件を満たせば、「コピー」や「ペースト」、「貼り付け」などの機能が実行されます。
| Command | 内容 |
|---|---|
| Copy | 選択項目をクリップボードにコピーします。 |
| Cut | 選択範囲をクリップボードに切り取りします。 |
| Paste | 選択項目をクリップボードに貼り付けます。 |
| Redo | 最後の操作をやり直します。 |
| Undo | 最後の操作を元に戻します。 |
| Open | ファイルを開きます。 |
| Close | ファイルを閉じます。 |
| 現在の項目を出力します。 | |
| Save | 現在の項目を保存します。 |
代表的な Command が以下にになります。(参考:サイト)
<Window
    x:Class="Sample.MainWindow"
    xmlns="http://schemas.microsoft.com/winfx/2006/xaml/presentation"
    xmlns:x="http://schemas.microsoft.com/winfx/2006/xaml"
    xmlns:d="http://schemas.microsoft.com/expression/blend/2008"
    xmlns:mc="http://schemas.openxmlformats.org/markup-compatibility/2006"
    Title="MainWindow"
    Width="300"
    Height="200"
    mc:Ignorable="d">
    <Grid>
        <Grid.RowDefinitions>
            <RowDefinition Height="*" />
            <RowDefinition Height="3*" />
        </Grid.RowDefinitions>
        <ToolBar Grid.Row="0">
            <Button Command="ApplicationCommands.Copy" ToolTip="コピー">
                <Image Source="Icons/Copy.png" />
            </Button>
            <Separator/>
            <Button Command="ApplicationCommands.Paste" ToolTip="ペースト">
                <Image Source="Icons/Paste.png" />
            </Button>
        </ToolBar>
        <TextBox Grid.Row="1" FontSize="14" Margin="5" AcceptsReturn="True" TextWrapping="Wrap"/>
    </Grid>
</Window>
このコードを実行した画面は次の通りです。
このように ToolBar 内のボタンをクリックすると、コマンドの処理が実行されます。
また、独自コマンドを実装して処理を実行させたい場合については、別の記事で紹介していますので参考にしてみて下さい。
ButtonのContentをバインドする
WPF では「MVVM」という概念の元にプロジェクトの開発を行います。
この MVVM とは、Model(データやそれを加工するロジックを行う部分)、View(データを適した形で表示して入力を受け付けるUIの部分)、ViewModel(ModelとViewの双方の受け渡しを行う部分)の3つに分けて設計と実装をするということです。
ここでは、Button の Content プロパティに Name プロパティをバインドします。
Name プロパティは ViewModel クラスに記述します。
Viewの記述
まずは、これまで紹介したサンプルと同じように XAML コードに Button タグを追加します。今までと異なる点は、Content プロパティに ViewModel の Name プロパティをバインドしている点です。
<Window
    x:Class="Sample.MainWindow"
    xmlns="http://schemas.microsoft.com/winfx/2006/xaml/presentation"
    xmlns:x="http://schemas.microsoft.com/winfx/2006/xaml"
    xmlns:d="http://schemas.microsoft.com/expression/blend/2008"
    xmlns:mc="http://schemas.openxmlformats.org/markup-compatibility/2006"
    Title="MainWindow"
    Width="300"
    Height="180"
    mc:Ignorable="d">
    <Grid>
        <Grid.RowDefinitions>
            <RowDefinition Height="*" />
            <RowDefinition Height="2*" />
        </Grid.RowDefinitions>
        <Button Content="{Binding Name}" Margin="5"/>
        <TextBox
            Grid.Row="1"
            Margin="5"
            AcceptsReturn="True"
            FontSize="14"
       Text="{Binding Name}"
            TextWrapping="Wrap" />
    </Grid>
</Window>
ViewModelの記述
続いて、プロジェクトに cs ファイルを新規作成して、ViewModel というクラスを作成します。
ViewModel から View へバインドで同期するには、ViewModel となるオブジェクトが INotifyPropertyChanged を実装してプロパティが変更通知を実装している必要があります。
ViewModel には INotifyPropertyChanged を継承して、インターフェースと変更通知の実装をしておきましょう。
using System.ComponentModel;
using System.Runtime.CompilerServices;

namespace Sample
{
    public class ViewModel : INotifyPropertyChanged
    {
        // INotifyPropertyChangedインターフェースの実装
        public event PropertyChangedEventHandler PropertyChanged;

        public void RaisePropertyChanged([CallerMemberName] string propertyName = null)
            => PropertyChanged?.Invoke(this, new PropertyChangedEventArgs(propertyName));

        //名前プロパティ
        private string _Name;
        public string Message
        {
            get { return _Name; }
            set { if (_Name != value) { _Name = value; RaisePropertyChanged(); } }
        }
    }
}
Modelの記述
最後に View と ViewModel を同期させるために、Model(Window.xaml.cs)側で DataContext プロパティにViewModel のインスタンスをセットします。
using System.Windows;

namespace Sample
{
    public partial class MainWindow : Window
    {
        ViewModel viewModel = new ViewModel();

        public MainWindow()
        {
            InitializeComponent();

            //データコンテンツにViewModelを設定
            DataContext = viewModel;
        }
    }
}
View と Model の受け渡しをする ViewModel が機能していることを確認する為に、TextBox に入力した値が Button に表示されることをチェックします。
アプリケーションを起動して動作確認をしてみましょう。
Button はプロパティの値が変更された直後に変更されることはありません。
Button に対してアクション(クリックなど)を行った時にプロパティの値を取得して、ボタンに表示する文字列が更新されます。
これは TextBox にバインドされたプロパティの更新は、TextBox のフォーカスを失って初めて更新されるからです。(参考サイト:更新タイミングを制御する)
プロパティを更新するタイミングを変更すれば解決します。バインディングの Mode プロパティを「TwoWay」、 UpdateSourceTrigger プロパティを「PropertyChanged」に設定を変更します。
<Window
    x:Class="Sample.MainWindow"
    xmlns="http://schemas.microsoft.com/winfx/2006/xaml/presentation"
    xmlns:x="http://schemas.microsoft.com/winfx/2006/xaml"
    xmlns:d="http://schemas.microsoft.com/expression/blend/2008"
    xmlns:mc="http://schemas.openxmlformats.org/markup-compatibility/2006"
    Title="MainWindow"
    Width="300"
    Height="180"
    mc:Ignorable="d">
    <Grid>
        <Grid.RowDefinitions>
            <RowDefinition Height="*" />
            <RowDefinition Height="2*" />
        </Grid.RowDefinitions>
        <Button Margin="5" Content="{Binding Name}" />
        <TextBox
            Grid.Row="1"
            Margin="5"
            AcceptsReturn="True"
            FontSize="14"
            Text="{Binding Name, Mode=TwoWay, UpdateSourceTrigger=PropertyChanged}"
            TextWrapping="Wrap" />
    </Grid>
</Window>
修正したアプリケーションを起動して動作確認をしてみましょう。
このように TextBox の Text プロパティが更新される度に、Button の Content プロパティも更新されるようになりました。
まとめ

この記事では、Button の使い方についてまとめてご紹介しました。
Content プロパティは「文字列」だけでなく、StackPanel と組み合わせることで「画像+文字列」を表示することができます。
また、Content をバインドさせるといった方法もあるので、まずは使用頻度が最も高い Button の使い方を抑えて、他のコントロールを扱えるようになりましょう。


以上、最後まで読んで頂きありがとうございます。