
MVVMて何?どうやって実装するの?
こんな疑問をお持ちの方にオススメの記事です。この記事では WPF の設計手法として用いられる MVVM パターンについて画像やサンプルコードを交えて分かりやすく解説をしています。
WPF などの XAML ベースのアプリケーション開発では、MVVM(Model-View-ViewModel)パターンによる設計が用いられることが多いです。MVVM はアプリケーションのロジックとUIを分離し、テスタビリティや保守性を向上させることを目的としています。
MVVM パターンについて知りたい方はぜひ最後まで読んでみて下さい。
オススメの参考書
C#の使い方が丁寧に解説しており、「基礎からしっかりと学びたい」という初心者の方にオススメの一冊です。サンプルコードも記載してあり、各章の最後に復習問題があるので理解度を確認しながら読み進めることができます。新しい C# のバージョンにも対応している書籍です。
MVVMパターンとは

MVVM パターンとは、Model-View-ViewModel から構成される設計手法の事です。

- View:UI 部分を担当する
- ViewModel:View と Model の仲介役を担当する
- Model:ロジック部分を担当する
このパターンで設計する事で、アプリケーションの UI 部分とロジック部分を分離し、保守性と拡張性を向上させることができます。また、それぞれの担当が明確になることで、どこに何の処理が記述してあるかが追いやすく開発効率を上げることが可能になります。
各要素は以下のような役割を担っています。
Viewの役割
View は TextBox や Button など UI 部分、つまりアプリのデザインを担当します。WPF では XAML でユーザーインターフェイス定義します。
View に表示する可変データは、ViewModel で宣言されたプロパティと紐づけします。また、ボタンのクリックなどユーザーの操作を ViewModel に宣言されたコマンドと紐づけします。この View と ViewModel を紐づけるための機能が「DataBinding」です。
- UI を XAML で定義する
- データバインディングで ViewModel のプロパティやコマンドと紐づける
- ViewModel の変更通知を受け取り、画面へ表示する
- ViewModel へユーザー操作やテキスト等を伝える
ViewModelの役割
ViewModel は UI に表示するデータ用のプロパティやコマンドなどを宣言したり、コマンドが実行されたら Model のロジックを実行して戻り値を受け取って、その値を View へ伝えたりと、View と ViewModel を繋ぐ仲介役を担当します。
ViewModel は Model を参照しますが、View を参照することはありません。View の TextBox や ComboBox の名前を使って、値を取得するようなことはしません(TextBox1.Text や ComboBox1.SelectedValue など)。View の情報は DataBinding によって自身で宣言したプロパティに値が格納されているので参照する必要がないのです。
View へデータを通知するには、InotifyPropertyChanged を使用します。
- View に表示するデータ用のプロパティやコマンドを定義する
- Model のロジックの実行指示、戻り値の受け取りを行う
- ロジックによって変更されたプロパティ値を View へ伝える
Modelの役割
単体で動作するロジックや独立したデータの保持を担当します。ロジックとは例えば、API から情報を取得したり、DB の操作(登録、削除、更新)などを実行する処理の事です。
この Model は必ずしも必要というわけではなく、規模が小さいアプリケーション開発では、Model の内容を ViewModel に記述する場合もあります。
とは言え、ViewModel だけで完結させようとすると、ViewModel のコードが肥大化してしまうことがありますので、無理に ViewModel に詰め込むのではなく、Model へ切り分けを行いましょう。そうすればどこに何の処理があるか分かるようになり、可読性の向上に繋がります。
- 単体で動作するロジックを記述する
- ViewModel から実行指示を受けて、ロジックを実行する
- 小規模のアプリケーション開発ではModelがない場合がある
MVVMパターンの構成について

それでは具体的なソースコードを記述しながら、MVVM でアプリケーションを作成します。ここでは、ユーザーが TextBox に入力したテキストをテキストファイルへ保存するアプリを作成します。
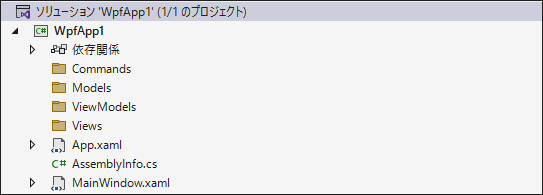
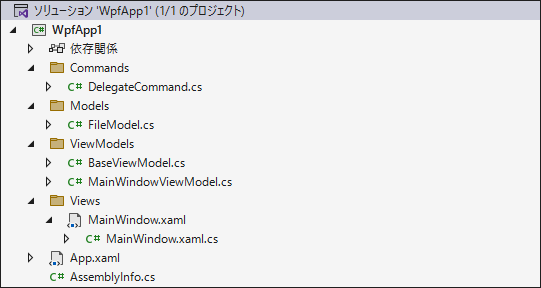
Visual Studio でプロジェクトを作成して、プロジェクトにフォルダを追加して下記の構成にします。MVVM パターンで実装する際によく用いられる構成です。
ViewModelの実装
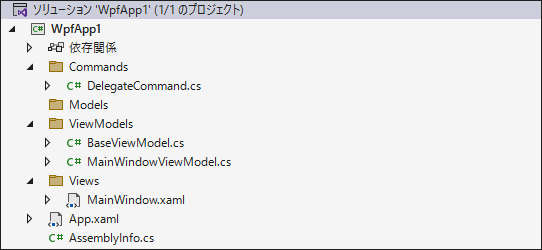
「ViewModels」フォルダを選択して、BaseViewModel.cs と MainWindowViewModel.cs を追加します。更に「Commands」フォルダを選択して、DelegateCommand.cs を追加します。
変更通知プロパティ
ViewModel -> View へプロパティの変更を通知するために使用されるのが INotifyPropertyChanged インタフェース です。このインターフェイスを継承したクラスには、プロパティの変更通知イベントを実装します。
//
// 概要:プロパティ値が変更されたことをクライアントに通知します。
//
public interface INotifyPropertyChanged
{
    //
    // 概要:プロパティ値が変更されたときに発生します。
    //
    event PropertyChangedEventHandler? PropertyChanged;
}
BaseViewModel.cs を開いて、INotifyPropertyChangedを継承します。プロパティの変更通知イベントPropertyChangedとプロパティの変更通知イベントを呼び出すメソッドRaisePropertyChangedを実装します。
public class BaseViewModel : INotifyPropertyChanged
{
    /// <summary>
    /// プロパティ変更通知イベント
    /// </summary>
    public event PropertyChangedEventHandler? PropertyChanged;

    /// <summary>
    /// プロパティ変更通知イベント呼び出しメソッド
    /// </summary>
    /// <param name="propertyName">変更対象プロパティ名を表す文字列</param>
    protected void RaisePropertyChanged([CallerMemberName] string propertyName = "")
    {
        PropertyChanged?.Invoke(this, new PropertyChangedEventArgs(propertyName));
    }
}
続いて、MainWindowViewModel.cs を開いて、BaseViewModelを継承します。
このクラスに MainWindow のTextBoxのTextプロパティと紐づけ(バインディング)するプロパティを実装します。このプロパティで重要なのがプロパティの setter に RaisePropertyChanged メソッドを実装する事です。これにより、ViewModel と View 間でプロパティの変更が通知されるようになります。このプロパティのことを「変更通知プロパティ」と呼ばれます。
public class MainWindowViewModel : BaseViewModel
{
    private string text;

    /// <summary>
    /// MainWindowsのTextBoxとBindingするプロパティ
    /// </summary>
    public string Text
    {
        get { return text; }
        set
        {
            if (value != text)
            {
                text = value;
                RaisePropertyChanged();
            }
        }
    }
}
このようにプロパティの setter でRaisePropertyChangedメソッドを呼び出す必要があるので、コード量が多くなってしまいます。
行数を減らしたい場合は次のようにインデントを無くして記述するといいでしょう。
public class MainWindowViewModel : BaseViewModel
{
    private string text;

    /// <summary>
    /// MainWindowsのTextBoxとBindingするプロパティ
    /// </summary>
    public string Text
    {
        get { return text; }
        set { if (value != text) { text = value; RaisePropertyChanged(); } }
    }
}
コマンド
View -> ViewModel へユーザーの操作(アクション)を通知するために使用されるのが ICommand インタフェース です。このインターフェイスを継承したクラスには、コマンドを実装するメソッドやコマンドの実行可能かどうかを決定するメソッドを実装します。
public interface ICommand
{
    //
    // 概要:コマンドを実行するかどうかに影響するような変更があった場合に発生します。
    //
    event EventHandler CanExecuteChanged;

    //
    // 概要:現在の状態でコマンドが実行可能かどうかを決定するメソッドを定義します。
    //
    bool CanExecute(object parameter);

    //
    // 概要:コマンドが起動される際に呼び出すメソッドを定義します。
    //
    void Execute(object parameter);
}
DelegateCommand.cs を開いて、ICommandを継承します。コマンドの発火するイベントCanExecuteChanged、コマンドの実行可能かどうかを返すメソッドCanExecute、コマンドの実行メソッドExecuteについては以下の記事で詳しく記載していますので参考にしてみて下さい。
MainWindow のButtonのCommandプロパティと紐づけ(バインディング)するコマンドプロパティを実装します。
MainWindowViewModel.cs のコンストラクタでコマンドのインスタンスを生成します。インスタンス生成時にコマンドの実行処理メソッドOnClickCommandとコマンドが実行可能かどうか決定するメソッドCanClickCommandを指定します。
また、コマンド実行可否の状態を変更する通知メソッドをTextプロパティの setter に設定します。こうすることでTextプロパティの状態によって、コマンドが実行できるようになります。ここでは、Textプロパティが空ではない時にコマンドが実行できます。
public class MainWindowViewModel : BaseViewModel
{
    private string text;

    public DelegateCommand ClickCommand { get; }

    /// <summary>
    /// MainWindowsのTextBoxとBindingするプロパティ
    /// </summary>
    public string Text
    {
        get { return text; }
        set
        {
            if (value != text)
            {
                text = value;
                RaisePropertyChanged();

                // コマンド実行可否の変更通知メソッド
                ClickCommand.DelegateCanExecute();
            }
        }
    }

    /// <summary>
    /// コンストラクタ
    /// </summary>
    public MainWindowViewModel()
    {
        ClickCommand = new DelegateCommand(OnClickCommand, CanClickCommand);
    }

    /// <summary>
    /// コマンドの実行処理メソッド
    /// </summary>
    private void OnClickCommand()
    {
        // ここにコマンドの処理を記述する
    }

    /// <summary>
    /// コマンドが実行可能かどうかを決定するメソッド
    /// </summary>
    private bool CanClickCommand()
    {
        return !string.IsNullOrEmpty(Text);
    }
}
Viewの実装
MainWindow.xaml を開いて、TextBoxとButtonを配置します。
<Window
    x:Class="WpfApp1.Views.MainWindow"
    xmlns="http://schemas.microsoft.com/winfx/2006/xaml/presentation"
    xmlns:x="http://schemas.microsoft.com/winfx/2006/xaml"
    xmlns:d="http://schemas.microsoft.com/expression/blend/2008"
    xmlns:local="clr-namespace:WpfApp1"
    xmlns:mc="http://schemas.openxmlformats.org/markup-compatibility/2006"
    Title="MainWindow"
    Width="500"
    Height="100"
    mc:Ignorable="d">
    <Grid Margin="10">
        <Grid.ColumnDefinitions>
            <ColumnDefinition Width="*" />
            <ColumnDefinition Width="100" />
        </Grid.ColumnDefinitions>
        <TextBox Grid.Column="0" />
        <Button Grid.Column="1" Content="保存" />
    </Grid>
</Window>
バインディング
MainWindowViewModel.cs で宣言した変更通知プロパティを MainWindow.xaml のTextBoxのTextプロパティとバインディングします。同じように、MainWindowViewModel.cs で宣言したコマンドプロパティを MainWindow.xaml のButtonのCommandプロパティとバインディングします。
バインディングは”{Binding ViewModelで宣言したプロパティ名}”のようにします。
TextBoxにはバインディングのオプションを追加しています。UpdateSourceTriggerがPropertyChangedだった場合、TextBoxの値が変更される度に View -> ViewModel へプロパティの変更が通知されます。つまり、リアルタイムでプロパティが通知されます。UpdateSourceTriggerは他にLostFocusやExplicitがあります。
<Window
    x:Class="WpfApp1.Views.MainWindow"
    xmlns="http://schemas.microsoft.com/winfx/2006/xaml/presentation"
    xmlns:x="http://schemas.microsoft.com/winfx/2006/xaml"
    xmlns:d="http://schemas.microsoft.com/expression/blend/2008"
    xmlns:local="clr-namespace:WpfApp1"
    xmlns:mc="http://schemas.openxmlformats.org/markup-compatibility/2006"
    Title="MainWindow"
    Width="500"
    Height="100"
    mc:Ignorable="d">
    <Grid Margin="10">
        <Grid.ColumnDefinitions>
            <ColumnDefinition Width="*" />
            <ColumnDefinition Width="100" />
        </Grid.ColumnDefinitions>
        <TextBox
            Grid.Column="0"
            Text="{Binding Text, UpdateSourceTrigger=PropertyChanged}" />
        <Button
            Grid.Column="1"
            Command="{Binding ClickCommand}"
            Content="保存" />
    </Grid>
</Window>
データコンテキスト
View と ViewModel を連携するために、MainWindow のDataContextプロパティにMainWindowViewModelのオブジェクトを設定します。
DataContextプロパティに ViewModel を設定しない場合、たとえ View で ViewModel のプロパティをバインディングしていても変更が通知されることはないので注意しましょう。
<Window
    x:Class="WpfApp1.Views.MainWindow"
    xmlns="http://schemas.microsoft.com/winfx/2006/xaml/presentation"
    xmlns:x="http://schemas.microsoft.com/winfx/2006/xaml"
    xmlns:d="http://schemas.microsoft.com/expression/blend/2008"
    xmlns:vm="clr-namespace:WpfApp1.ViewModels"
    xmlns:mc="http://schemas.openxmlformats.org/markup-compatibility/2006"
    Title="MainWindow"
    Width="500"
    Height="100"
    mc:Ignorable="d">
    <Window.DataContext>
        <vm:MainWindowViewModel/>
    </Window.DataContext>
    <Grid Margin="10">
        <Grid.ColumnDefinitions>
            <ColumnDefinition Width="*" />
            <ColumnDefinition Width="100" />
        </Grid.ColumnDefinitions>
        <TextBox
            Grid.Column="0"
            Text="{Binding Text, UpdateSourceTrigger=PropertyChanged}" />
        <Button
            Grid.Column="1"
            Command="{Binding ClickCommand}"
            Content="保存" />
    </Grid>
</Window>
Modelの実装
「Models」フォルダを選択して、FileModel.cs を追加します。
ここではテキストファイルに書き込むクラスを作成します。ファイルの書き込み方法は次の記事で紹介していますので、参考にしてみて下さい。
FileModel.cs は次のように記述します。ファイル名のチェックや例外処理などは省略しています。
public class FileModel
{
    public string FileName { get; set; }

    public FileModel(string fileName)
    {
        FileName = fileName;
    }

    public void WriteFile(string data)
    {
        using (StreamWriter sw = new StreamWriter(FileName, true, Encoding.GetEncodingEncoding.ASCII))
        {
            //テキストを書き込む
            sw.WriteLine(data);
        }
    }
}
ViewModel のコマンドで FileModel.cs のWriteFileメソッドを実行するようにします。
MainWindowViewModel.cs を開いて、コードを追加します。
public class MainWindowViewModel : BaseViewModel
{
    private string text;
    private FileModel fileModel;

    public DelegateCommand ClickCommand { get; }

    /// <summary>
    /// MainWindowsのTextBoxとBindingするプロパティ
    /// </summary>
    public string Text
    {
        get { return text; }
        set
        {
            if (value != text)
            {
                text = value;
                RaisePropertyChanged();

                // コマンド実行可否の変更通知メソッド
                ClickCommand.DelegateCanExecute();
            }
        }
    }

    /// <summary>
    /// コンストラクタ
    /// </summary>
    public MainWindowViewModel()
    {
        fileModel = new FileModel("Sample.txt");
        ClickCommand = new DelegateCommand(OnClickCommand, CanClickCommand);
    }

    /// <summary>
    /// コマンドの実行処理メソッド
    /// </summary>
    private void OnClickCommand()
    {
        // ここにコマンドの処理を記述する
        fileModel.WriteFile(Text);
        Text = string.Empty;
    }

    /// <summary>
    /// コマンドが実行可能かどうかを決定するメソッド
    /// </summary>
    private bool CanClickCommand()
    {
        return !string.IsNullOrEmpty(Text);
    }
}
アプリケーションを実行
ここまで作成したらアプリケーションを実行してみましょう。
実行すると次のような動作になります。

[保存]ボタンをクリックすると、アプリケーションがある階層に Sample.txt が生成されます。ファイルを開くと、TextBoxに入力した文字が書き込まれています。
SAMPLE
TEST
まとめ

この記事では、MVVM パターンについてサンプルコードを交えて解説をしました。
- View:UI 部分を担当する
- ViewModel:View と Model の仲介役を担当する
- Model:ロジック部分を担当する
WPF では、MVVM パターンで設計できるように Binding や Command などが用意されていますので、これらの機能を積極的に活用してアプリ開発をしてみてはいかがでしょうか。


以上、最後まで読んで頂きありがとうございました。


