WPF などの XAML ベースのアプリケーション開発では、MVVM(Model-View-ViewModel)パターンによる設計が用いられることが多いです。MVVM はアプリケーションのロジックとUIを分離し、テスタビリティや保守性を向上させることを目的としています。

MVVM パターンではCommandプロパティを使って、イベントのアクションを ViewModel に記述します。ただ、使うコントロールによってはCommandプロパティが含まれていないものがあります。
こういう場合は、Microsoft が提供する「Behaviors」というライブラリを利用することで、Commandプロパティをサポートしていないコントロールもコマンドが扱えるようになります。
MVVM でアプリケーション開発をしようとしている方は、ぜひ参考にしてみて下さい。
オススメの参考書
C#の使い方が丁寧に解説しており、「基礎からしっかりと学びたい」という初心者の方にオススメの一冊です。サンプルコードも記載してあり、各章の最後に復習問題があるので理解度を確認しながら読み進めることができます。新しい C# のバージョンにも対応している書籍です。

Behaviorsについて

Microsoft が提供している Behaviors(ビヘイビア)は MVVM(Model-View-ViewModel)パターンで使われるライブラリです。Behaviors の EventTrigger を介して、View の Event を ViewModel の Command で呼び出すことができ、View と View 以外のコードを分離する(疎結合)ことができます。
\ GitHubのサイトへ移動する /
Behaviors は Command プロパティがサポートされていない UI コントロール(例えば、ComboBox や TextBox)にコマンドがあるかのように振る舞うことができます。
MVVM によるアプリ開発を行う場合は、以下の手順でインストールをしてみましょう。
Behaviorsのインストール

Behaviors は Visual Studio の NuGet からインストールすることができます。
ここでは以下の開発環境でインストールを行います。
開発環境
- Visual Studio 2022
- WPF(Windows Presentation Foundation)
- .NET 7
- Windows 11
Visual Studio でプロジェクトファイルを起動して、以下の手順に沿ってインストールをします。
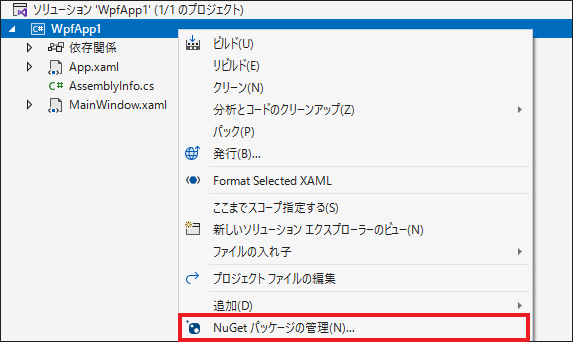
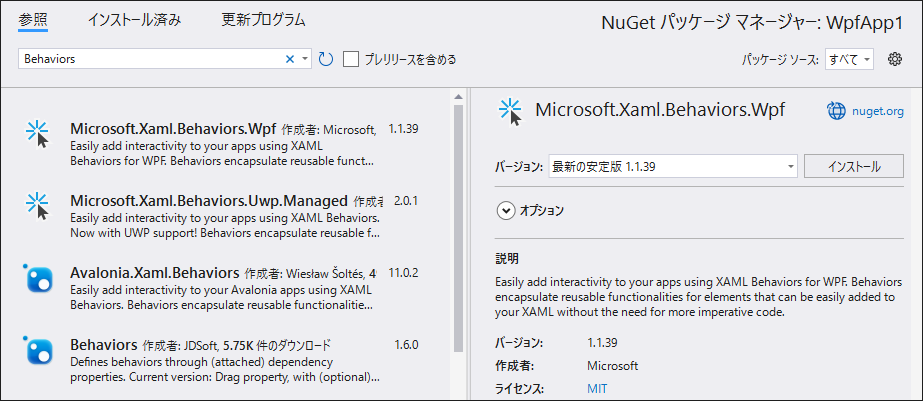
ソリューションエクスプローラーからプロジェクト名の上で右クリックして、「NuGet パッケージの管理(N)」をクリックします。
NuGet パッケージ マネージャー画面が開くので、検索欄に「Behaviors」と入力して検索します。検索結果の一番上に作者名が Microsoft の「Microsoft.Xaml.Behaviors.Wpf」が表示されるので、選択します。
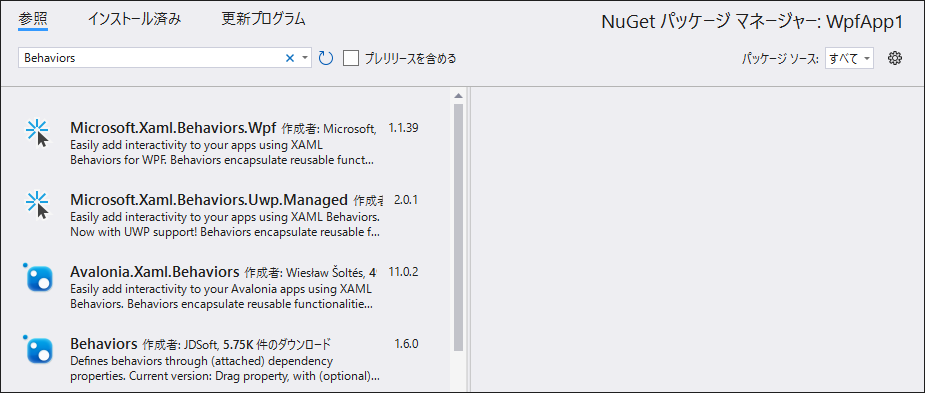
「インストール」ボタンをクリックします。ここでは最新の安定版であるバージョン1.1.39をインストールします。
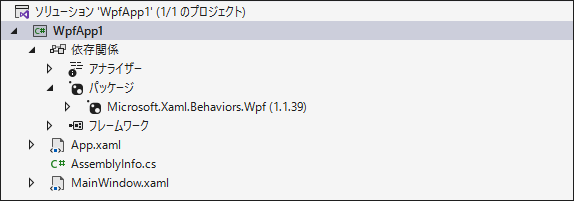
インストールが完了すると、プロジェクトの[依存関係] -> [パッケージ]に Microsoft.Xaml.Behaviors.Wpf が追加されます。
Behaviorsの使い方

ここからは Behaviors の使い方を紹介します。
まずは View を開いて、Behaviors の名前空間の参照先を追加します。
<Window
    x:Class="WpfApp1.MainWindow"
    xmlns="http://schemas.microsoft.com/winfx/2006/xaml/presentation"
    xmlns:x="http://schemas.microsoft.com/winfx/2006/xaml"
    xmlns:d="http://schemas.microsoft.com/expression/blend/2008"
    xmlns:i="http://schemas.microsoft.com/xaml/behaviors"
    xmlns:vm="clr-namespace:WpfApp1.ViewModels"
    xmlns:mc="http://schemas.openxmlformats.org/markup-compatibility/2006"
    Title="MainWindow"
    Width="800"
    Height="450"
    mc:Ignorable="d" >
    <Window.DataContext>
        <vm:MainWindowViewModel/>
    </Window.DataContext>
</Window>
これで Behaviors を使用する準備が完了しました。
※事前に View のDataContextプロパティに ViewModel を追加しています。(13~15行目)
LoadedイベントをCommandで実行する
View のLoadedイベントをCommandで実行するには次のように記述します。
ポイントはEventTrigger のEventNameにCommandと関連付けるイベントの名前を記述することです。イベントの名前が正しくないと動作しないので、入力を間違えないようにしましょう。
InvokeCommandActionのCommandに ViewModel で定義しているLoadedCommandをバインディングします。
<Window
    x:Class="WpfApp1.MainWindow"
    xmlns="http://schemas.microsoft.com/winfx/2006/xaml/presentation"
    xmlns:x="http://schemas.microsoft.com/winfx/2006/xaml"
    xmlns:d="http://schemas.microsoft.com/expression/blend/2008"
    xmlns:i="http://schemas.microsoft.com/xaml/behaviors"
    xmlns:vm="clr-namespace:WpfApp1"
    xmlns:mc="http://schemas.openxmlformats.org/markup-compatibility/2006"
    Title="MainWindow"
    Width="800"
    Height="450"
    mc:Ignorable="d" >
    <Window.DataContext>
        <vm:MainWindowViewModel/>
    </Window.DataContext>
    <i:Interaction.Triggers>
        <i:EventTrigger EventName="Loaded">
            <i:InvokeCommandAction Command="{Binding LoadedCommand}" />
        </i:EventTrigger>
    </i:Interaction.Triggers>
</Window>ViewModelのLoadedCommandプロパティは次のように定義しています。
MainWindowViewModelのコンストラクタで、DelegateCommandクラスのインスタンスを生成します。この時、引数にコマンドの実行処理メソッド名を指定します。
DelegateCommandはICommandを継承したクラスです。このクラスについては次の記事で紹介していますので、参考にしてみて下さい。
LoadedCommandの実行部分はOnLoadedCommandメソッドになります。
public class MainWindowViewModel
{
    public ICommand LoadedCommand { get; }

    public MainWindowViewModel()
    {
        LoadedCommand = new DelegateCommand(OnLoadedCommand);
    }

    private void OnLoadedCommand()
    {
        // ここにLoadedイベントの処理を記述する
        Debug.WriteLine("Loadedイベントが実行されました");
    }
}
これを実行すると次のようになります。
Loadedイベントが実行されました
TextBoxのTextChangedイベントをCommandで実行する
TextBoxのTextChangedイベントをCommandで実行するには次のように記述します。
TextBoxのタグの中でEventTriggerを記述し、EventNameをTextChangedにします。Commandには ViewModel で定義しているTextChangedCommandをバインディングします。
また、コマンドのパラメーターを指定できます。ここではTextBoxのTextプロパティをコマンドのパラメーターとして指定しています。
<Window
    x:Class="WpfApp1.MainWindow"
    xmlns="http://schemas.microsoft.com/winfx/2006/xaml/presentation"
    xmlns:x="http://schemas.microsoft.com/winfx/2006/xaml"
    xmlns:d="http://schemas.microsoft.com/expression/blend/2008"
    xmlns:i="http://schemas.microsoft.com/xaml/behaviors"
    xmlns:mc="http://schemas.openxmlformats.org/markup-compatibility/2006"
    xmlns:vm="clr-namespace:WpfApp1.Model"
    Title="MainWindow"
    Width="250"
    Height="100"
    mc:Ignorable="d">
    <Window.DataContext>
        <vm:MainWindowViewModel />
    </Window.DataContext>
    <TextBox
        x:Name="TextBox1"
        Margin="10"
        VerticalContentAlignment="Center">
        <i:Interaction.Triggers>
            <i:EventTrigger EventName="TextChanged">
                <i:InvokeCommandAction Command="{Binding TextChangedCommand}" CommandParameter="{Binding ElementName=TextBox1, Path=Text}" />
            </i:EventTrigger>
        </i:Interaction.Triggers>
    </TextBox>
</Window>ViewModelのTextChangedCommandプロパティは次のように定義しています。
コマンドの実行処理をするOnTextChangedCommandメソッドの引数でコマンドパラメーターを受け取ります。TextBoxのTextプロパティは string 型なので、引数は string 型を指定します。
public class MainWindowViewModel
{
    public ICommand TextChangedCommand { get; }

    public MainWindowViewModel()
    {
        TextChangedCommand = new DelegateCommand<string>(OnTextChangedCommand);
    }

    private void OnTextChangedCommand(string parameter)
    {
        // ここにTextChangedイベントの処理を記述する
        Debug.WriteLine($"TextBoxのTextプロパティの値:{parameter}");
    }
}
これを実行してTestBoxに「Event」という入力すると、出力ログは次のようになります。
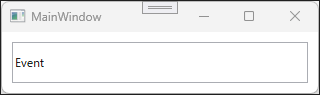
TextBoxのTextプロパティの値:E
TextBoxのTextプロパティの値:Ev
TextBoxのTextプロパティの値:Eve
TextBoxのTextプロパティの値:Even
TextBoxのTextプロパティの値:Event
ComboBoxのSelectionChangedイベントをCommandで実行する
ComboBoxのSelectionChangedイベントをCommandで実行するには次のように記述します。
ComboBoxのタグの中でEventTriggerを記述し、EventNameをSelectionChangedにします。Commandには ViewModel で定義しているSelectionChangedCommandをバインディングします。
先程はコントロールのプロパティをコマンドパラメーターに指定しましたが、イベントのデータを格納するクラス(EventArgs)をコマンドパラメーターとして指定したい場合は、PassEventArgsToCommandをtrueにします。
<Window
    x:Class="WpfApp1.MainWindow"
    xmlns="http://schemas.microsoft.com/winfx/2006/xaml/presentation"
    xmlns:x="http://schemas.microsoft.com/winfx/2006/xaml"
    xmlns:d="http://schemas.microsoft.com/expression/blend/2008"
    xmlns:i="http://schemas.microsoft.com/xaml/behaviors"
    xmlns:mc="http://schemas.openxmlformats.org/markup-compatibility/2006"
    xmlns:vm="clr-namespace:WpfApp1.Model"
    Title="MainWindow"
    Width="250"
    Height="100"
    mc:Ignorable="d">
    <Window.DataContext>
        <vm:MainWindowViewModel />
    </Window.DataContext>
    <ComboBox Margin="10" VerticalContentAlignment="Center">
        <ComboBoxItem Content="アイテム1" />
        <ComboBoxItem Content="アイテム2" />
        <ComboBoxItem Content="アイテム3" />
        <i:Interaction.Triggers>
            <i:EventTrigger EventName="SelectionChanged">
                <i:InvokeCommandAction Command="{Binding SelectionChangedCommand}" PassEventArgsToCommand="True" />
            </i:EventTrigger>
        </i:Interaction.Triggers>
    </ComboBox>
</Window>ViewModelのSelectionChangedCommandプロパティは次のように定義しています。
コマンドパラメーターの引数はSelectionChangedのイベントデータクラスであるSelectionChangedEventArgsにします。ここにはイベントのデータが格納されているので、選択されたComboBoxのアイテムなどの値が格納されています。
public class MainWindowViewModel
{
    public ICommand SelectionChangedCommand { get; }

    public MainWindowViewModel()
    {
        SelectionChangedCommand = new DelegateCommand<SelectionChangedEventArgs>(OnSelectionChangedCommand);
    }

    private void OnSelectionChangedCommand(SelectionChangedEventArgs parameter)
    {
        // ここにSelectionChangedイベントの処理を記述する
        if (parameter is null) return;
        var source = parameter.Source as ComboBox;
        var item = source.SelectedValue as ComboBoxItem;
        Debug.WriteLine($"ComboBoxで選択した値:{item.Content}");
    }
}
これを実行して、アイテムを選択すると次のようになります。
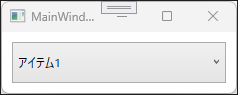
ComboBoxで選択した値:アイテム1
まとめ

この記事では、Microsoft が提供している Behaviors(ビヘイビア)を使ってイベントをコマンドで実装する方法を紹介しました。
Behaviors のEventTrigger を使うことでCommandをサポートしていないコントロールでもコマンドを扱うことができるようになります。コマンドのパラメーターの指定も難しくないので、これらの機能を利用して MVVM パターンでアプリケーションを開発してみましょう。


以上、最後まで読んで頂きありがとうございました。