C#のWPFを検索すると、「データバインディング」というを単語を目にする事が結構あるのではないでしょうか?

データバインディングて何だろう?
WPF では画面(UI)とロジック(UI以外の処理)を分けて開発する MVVM(Model-View-ViewModel)パターンが推奨されています。このパターンによる開発を実現する機能の1つがデータバインディングです。他にもコマンドという機能があります。

このデータバインディングはWPFで重要な役割を担っているので、アプリケーションを作成する前に理解しておきたい内容の1つです。
この記事はデータ・バインディング(Binding)を理解する手助けとなることでしょう。ぜひ最後まで読んでみてください。
オススメの参考書
C#の使い方が丁寧に解説しており、「基礎からしっかりと学びたい」という初心者の方にオススメの一冊です。サンプルコードも記載してあり、各章の最後に復習問題があるので理解度を確認しながら読み進めることができます。新しい C# のバージョンにも対応している書籍です。

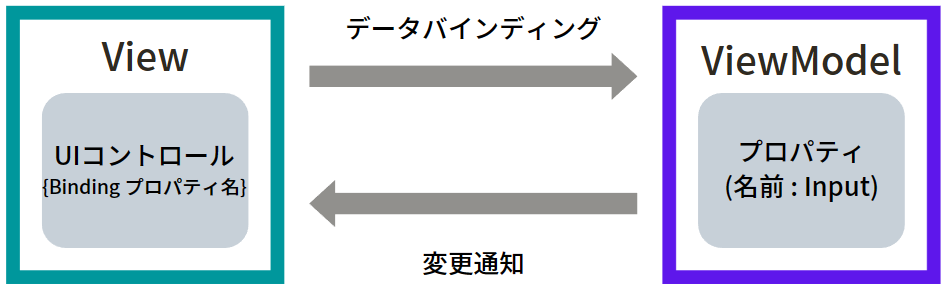
データ・バインディング(Binding)とは?

データ・バインディングとは、MVVM(Model-View-ViewModel)パターンによる開発を実現するための機能の1つで、ViewとViewModelを結びつける役割を持っています。
バインディング(Binding)という単語には、「結びつける」という意味があるように、Viewで変更されたコントロールの値はViewModelへ反映されます。また、ViewModel で変更された値は View へ変更が通知されてViewのコントロールへ反映されます。
もう少し理解を深める為に例として、「ボタンを押すと値が更新されて、その結果を画面に表示する」という場合で考えてみましょう。まずはMVVM パターンを採用しない場合は次のようになります。
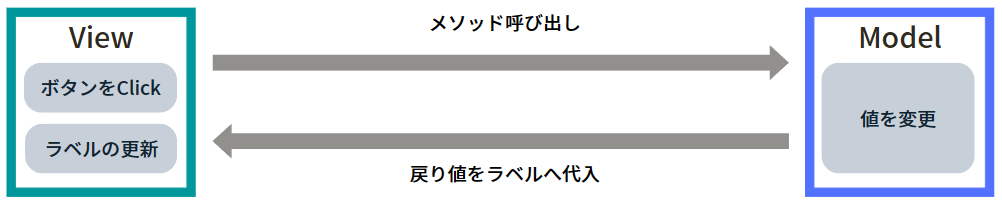
この設計方法では、画面とロジックが密結合になってしまいます。例えば、ロジック側の値を変更するメソッドの名前を変更した場合、メソッドの呼び出しをする画面も変更しなければなりません。このような設計方法を用いて開発する WinForms は画面とロジックを一体的に記述しているので、コードビハインドのコード量が肥大化してしまう傾向にあります。
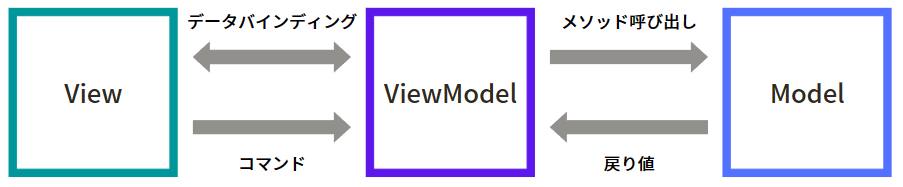
続いて、MVVM パターンを採用する場合は次のようになります。
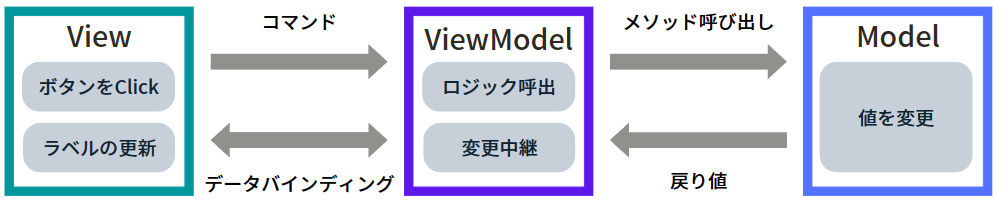
画面にあるボタンをクリックするとコマンドが実行されて、 中継する ViewModel がロジックにあるメソッドを呼び出します。その後、変更された値を中継する ViewModel へ通知し、ViewModel から画面のラベルへ変更を通知します。このように、ViewModel が画面とロジックを中継することで、画面とロジックを切り離して開発を進めことができます。
データバインディングの使い方

WPF で画面を開発する際、 XAML というマークアップ言語を用いて開発を行います。
この XAML を使って、View と ViewModel を結びつけるためにはいくつかのルールがあります。
- ターゲットとなるコントロールのプロパティにデータバインディングを記述する
- ViewのDataContextプロパティにデータソース(ViewModel)を設定する
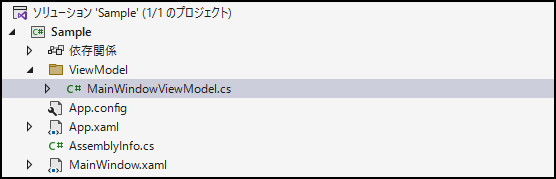
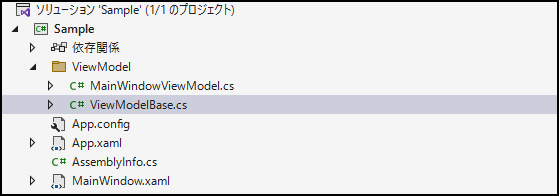
事前準備として、プロジェクトに「ViewModel」フォルダを作成し、フォルダの中に「MainWindowViewModel」クラスを作成します。
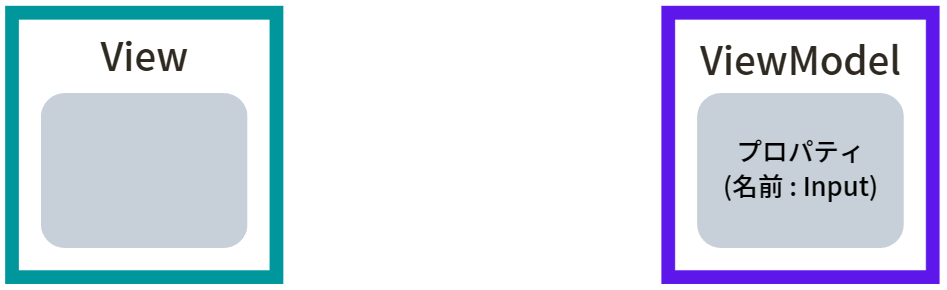
ターゲットとなるコントロールのプロパティにバインディングするプロパティを MainWindowViewModel.cs に記述します。
ここではプロパティの名前を Input にします。
namespace Sample.ViewModel
{
    class MainWindowViewModel
    {
        public string Input { get; set; } = "初期値";
    }
}
それでは、それぞれのルールについてみてみましょう。
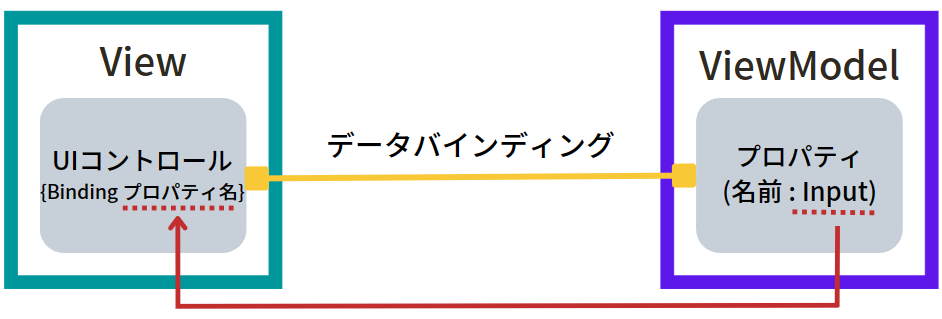
データバインディングを記述する
MainWindow.xaml を開いて、ターゲットとなるコントロールのプロパティに ”{Binding プロパティ名}” を記述します。UI コントロールのプロパティのほとんどがバインディングをサポートしています。
ここでは、TextBox のTextプロパティに ViewModel のInputプロパティをバインディングします。
<Window
    x:Class="Sample.MainWindow"
    xmlns="http://schemas.microsoft.com/winfx/2006/xaml/presentation"
    xmlns:x="http://schemas.microsoft.com/winfx/2006/xaml"
    xmlns:d="http://schemas.microsoft.com/expression/blend/2008"
    xmlns:local="clr-namespace:Sample"
    xmlns:mc="http://schemas.openxmlformats.org/markup-compatibility/2006"
    Title="MainWindow"
    Width="300"
    Height="100"
    mc:Ignorable="d">
    <Grid>
        <TextBox Text="{Binding Input}" />
    </Grid>
</Window>
DataContextを設定する
View と ViewModel は DataContext プロパティを介して双方向のデータのやり取りをします。
DataContextプロパティには MainWindowViewModel.cs のデータソース(オブジェクト)を設定します。データバインディングが XAML で記述されている場合は、DataContext(MainWindowViewModel)プロパティを参照して値がセットされます。
XAML もしくはコードビハインドのどちらかで設定することができます。参照先となる MainWindowViewModel.cs は名前空間を定義しておきます。
XAMLで設定する場合
xmlns:vm="clr-namespace:Sample.ViewModel"

<Window.DataContext>
    <vm:MainWindowViewModel/>
</Window.DataContext>
コードビハインドで設定する場合
using Sample.ViewModel;

namespace Sample
{
    public partial class MainWindow : Window
    {
        public MainWindow()
        {
            InitializeComponent();
            DataContext = new MainWindowViewModel();
        }
    }
}
これで最低限の設定は完了しました。
動作確認をする
設定したデータバインディングがどのように作用するのかを見てみましょう。
View と ViewModel の状態を可視化したいので、画面に TextBlock と Button を追加し、MainWindowViewModel.cs のInputプロパティを TextBlock のTextプロパティにバインディングします。Button がクリックされたら、MainWindowViewModel.cs のInputプロパティに「初期化」を代入する処理を記述します。
<Window
    x:Class="Sample.MainWindow"
    xmlns="http://schemas.microsoft.com/winfx/2006/xaml/presentation"
    xmlns:x="http://schemas.microsoft.com/winfx/2006/xaml"
    xmlns:d="http://schemas.microsoft.com/expression/blend/2008"
    xmlns:local="clr-namespace:Sample"
    xmlns:vm="clr-namespace:Sample.ViewModel"
    xmlns:mc="http://schemas.openxmlformats.org/markup-compatibility/2006"
    Title="MainWindow"
    Width="300"
    Height="160"
    mc:Ignorable="d">
    <Window.DataContext>
        <vm:MainWindowViewModel />
    </Window.DataContext>
    <Grid>
        <StackPanel Orientation="Vertical">
            <TextBox Margin="10" Text="{Binding Input}" />
            <TextBlock Margin="10" Text="{Binding Input}" />
            <Button Margin="10" Click="Button_Click" Content="プロパティの初期化" />
        </StackPanel>
    </Grid>
</Window>
コードビハインド(MainWindow.xaml.cs)には次のように記述します。
using System.Windows;
using Sample.ViewModel;

namespace Sample
{
    public partial class MainWindow : Window
    {
        public MainWindow()
        {
            InitializeComponent();
        }

        private void Button_Click(object sender, RoutedEventArgs e)
        {
            ((MainWindowViewModel)DataContext).Input = "ボタンをクリックしました";
        }
    }
}
ではアプリケーションを動かしてみましょう。
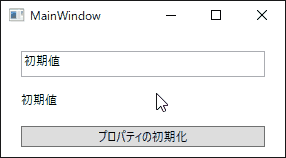
動作確認してみると分かるのですが、2つの改善点があります。
- Button をクリックしても、TextBox と TextBlock の文字が「初期化」に更新されない。… ①
- TextBox へ入力した直後に、TextBlock の値が更新されない。… ②
動的変更を通知する
まず①ですが、ViewModel で変更した値が View へ通知がされていません。
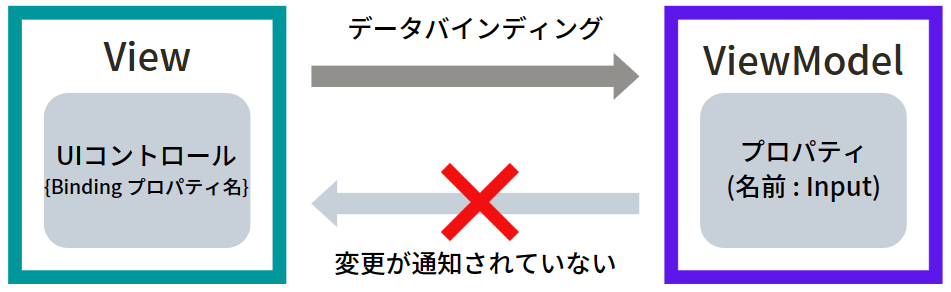
動的変更を View へ通知するために、プロパティの値に変更があったことを通知するイベントを用意します。WPF ではINotifyPropertyChangedインターフェイス(System.ComponentModel名前空間)を使ってイベントの実装を行います。
INotifyPropertyChanged を実装する方法ですが、PropertyChanged イベントを宣言し、OnPropertyChanged メソッドを作成する必要があります。
これを ViewModel 毎に記述するのは手間なので、ViewModelBase という基底クラスを作っておくと実装が楽になります。プロジェクトにある「ViewModel」フォルダの中に「ViewModelBase」クラスを作成します。
ViewModelBase.cs には次のように記述します。
using System.ComponentModel;
using System.Runtime.CompilerServices;

namespace Sample.ViewModel
{
    class ViewModelBase : INotifyPropertyChanged
    {
        // INotifyPropertyChanged を実装するためのイベントハンドラ
        public event PropertyChangedEventHandler PropertyChanged;

        // プロパティ名によって自動的にセットされる
        private void OnPropertyChanged([CallerMemberName] string propertyName = null) =>
            PropertyChanged?.Invoke(this, new PropertyChangedEventArgs(propertyName));
    }
}
次に、MainWindowViewModel に ViewModelBase を継承して、変更を通知する必要のあるプロパティについて、そのプロパティが更新されるたびに OnPropertyChanged を呼び出します。
MainWindowViewModel.cs を以下のように修正します。
namespace Sample.ViewModel
{
    internal class MainWindowViewModel : ViewModelBase
    {
        private string input = "初期化";

        // 入力テキスト用のプロパティ
        public string Input
        {
            get { return input; }
            set
            {
                if (input != value)
                {
                    input = value;
                    // 値をセットした後、画面側でも値が反映されるように通知する
                    OnPropertyChanged();
                }
            }
        }
    }
}
これで変更が通知されるようになりました。
更新トリガーの設定をする
②ですが、動作確認の Gif を確認すると TextBox からフォーカスから外れた(ボタンをクリックした)タイミングでInputプロパティと同期している TextBlock が更新されています。
これは、UpdateSourceTriggerのデフォルト値がLostFoucusになっているからです。UpdateSourceTriggerはバインディングの更新タイミングを決定します。
UpdateSourceTriggerプロパティでは以下の値を設定できます。
| 値 | 説明 |
|---|---|
| LostFocus | フォーカスが外れたタイミングでソースの値を更新します。 |
| PropertyChanged | プロパティの値が変化したタイミングでソースの値を更新します。 |
| Explicit | UpdateSourceメソッドを呼び出して明示的にソースの更新を指示したときのみソースの値を更新します。 |
今回は TextBox へ入力した直後にプロパティを更新したいので、UpdateSourceTriggerプロパティをLostFoucusからPropertyChangedへ変更します。
上記内容を XAML に反映させると次のようになります。
<Window
    x:Class="Sample.MainWindow"
    xmlns="http://schemas.microsoft.com/winfx/2006/xaml/presentation"
    xmlns:x="http://schemas.microsoft.com/winfx/2006/xaml"
    xmlns:d="http://schemas.microsoft.com/expression/blend/2008"
    xmlns:local="clr-namespace:Sample"
    xmlns:mc="http://schemas.openxmlformats.org/markup-compatibility/2006"
    Title="MainWindow"
    Width="300"
    Height="160"
    mc:Ignorable="d">
    <StackPanel Orientation="Vertical">
        <TextBox Margin="10" Text="{Binding Input, UpdateSourceTrigger=PropertyChanged}" />
        <TextBlock Margin="10" Text="{Binding Input}" />
        <Button Margin="10" Click="Button_Click" Content="プロパティの初期化" />
    </StackPanel>
</Window>
再度動作確認をする
修正したプログラムを動作させてみましょう。
変更前後の違いが分かるように、はじめと同じ動作をさせてみました。
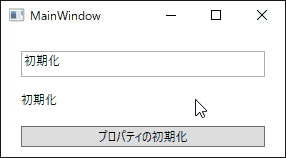
上図をみて頂ければ、全く異なる動作をしている事が分かると思います。
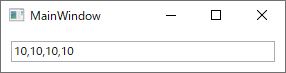
TextBo xに入力した値がすぐさまTextBlockへ反映されています。また、Button をクリックした時に TextBox と TextBlock の値が「初期化」になっています。
これでデータバインディングの最低限の設定が完了しました。
DataContext以外のBindingの使い方

Binding は、DataContent プロパティによるデータソースの指定以外に、いくつかの使い方があります。
ElementNameを指定して参照する方法
ElementName は、UIコントロール間で直接プロパティの値の同期を取りたい時に使用します。コントロールの Name(x:Name)プロパティで指定された名前を ElementName に指定します。
使い方の例として、Slider(スライダー)のValueプロパティの値を TextBlock のTextプロパティに表示します。ElementNameにSliderのNameを指定して、同期させるプロパティ名をPathに指定します。
<Window
    x:Class="Sample.MainWindow"
    xmlns="http://schemas.microsoft.com/winfx/2006/xaml/presentation"
    xmlns:x="http://schemas.microsoft.com/winfx/2006/xaml"
    xmlns:d="http://schemas.microsoft.com/expression/blend/2008"
    xmlns:local="clr-namespace:Sample"
    xmlns:mc="http://schemas.openxmlformats.org/markup-compatibility/2006"
    Title="MainWindow"
    Width="300"
    Height="100"
    mc:Ignorable="d">
    <Grid>
        <Slider Name="sliderName" Margin="10,10,10,40" Value="0" />
        <TextBlock Margin="10,40,10,10" Text="{Binding ElementName=sliderName, Path=Value}" />
    </Grid>
</Window>
上記の XAML を実行すると次のような動作になります。
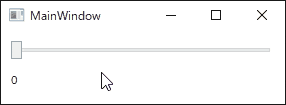
スライダーのValueプロパティと連動して TextBlock の値が更新されます。
RelativeSourceを指定して参照する方法
RelativeSource は、UIコントロールのプロパティ値や UI コントロールの親となる要素まで遡ってプロパティ値を取得したい場合に使います。
UI コントロールのプロパティ値を取得したい場合は、プロパティ名を指定し、RelativeSource のModeプロパティを「Self」にします。
<Window
    x:Class="Sample.MainWindow"
    xmlns="http://schemas.microsoft.com/winfx/2006/xaml/presentation"
    xmlns:x="http://schemas.microsoft.com/winfx/2006/xaml"
    xmlns:d="http://schemas.microsoft.com/expression/blend/2008"
    xmlns:local="clr-namespace:Sample"
    xmlns:mc="http://schemas.openxmlformats.org/markup-compatibility/2006"
    Title="MainWindow"
    Width="300"
    Height="80"
    mc:Ignorable="d">
    <Grid>
        <TextBox Margin="10,10,10,10"
                 Text="{Binding Margin, RelativeSource={RelativeSource Mode=Self}}" />
    </Grid>
</Window>
上記の XAML は次のような動作になります。
Marginの設定値が表示されます。
今度は UI コントロールの親となる要素まで遡ってプロパティ値を取得します。
この場合、AncestorTypeプロパティに親となる要素の情報を記入します。ここでは Window のTitleを取得しています。
<Window
    x:Class="Sample.MainWindow"
    xmlns="http://schemas.microsoft.com/winfx/2006/xaml/presentation"
    xmlns:x="http://schemas.microsoft.com/winfx/2006/xaml"
    xmlns:d="http://schemas.microsoft.com/expression/blend/2008"
    xmlns:local="clr-namespace:Sample"
    xmlns:mc="http://schemas.openxmlformats.org/markup-compatibility/2006"
    Title="MainWindow"
    Width="300"
    Height="80"
    mc:Ignorable="d">
    <Grid>
        <TextBox Margin="10,10,10,10"
                 Text="{Binding Title, RelativeSource={RelativeSource AncestorType={x:Type Window}}}" />
    </Grid>
</Window>
上記の XAML は次のような動作になります。
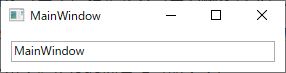
Window のタイトルである「MainWindow」が TextBox に表示されました。
BindingのMode設定
Binding には、データバインディングの向きを指定する為のModeプロパティというのがあります。
| モード | 説明 |
|---|---|
| OneWay | ソースからターゲットへの一方通行の同期になります。 |
| TwoWay | ソースとターゲットの双方向の同期になります。 |
| OneWayToSource | ターゲットからソースへの一方通行の同期になります。 |
| OneTime | ソースからターゲットへ初回の一度だけ同期されます。 |
双方向の同期が必要なコントロール(TextBox等)は、TwoWay を指定しておく必要があります。
まとめ

この記事では、WPF のデータバインディングについてサンプルを交えながら使い方を紹介しました。
- ターゲットとなるコントロールのプロパティにデータバインディングを記述する
- ViewのDataContextプロパティにデータソース(ViewModel)を設定する
- INotifyPropertyChangedを継承して変更通知のイベントを発生させる
データバインディングという仕組みは、WPF で推奨されている MVVM パターンで設計開発を行う上で必要不可欠なものです。ぜひ扱えるようになりましょう。
他にもコマンドという仕組みがあり、この内容については以下の記事で紹介しています。
おすすめのノートパソコンとモバイルディスプレイについて紹介していますので、興味がある方はチェックしてみて下さい。


以上、最後まで読んでいただきありがとうございました。