アプリで何かしら処理を実行している最中に、プログレスバーで進捗状況を表示したい時てありますよね。
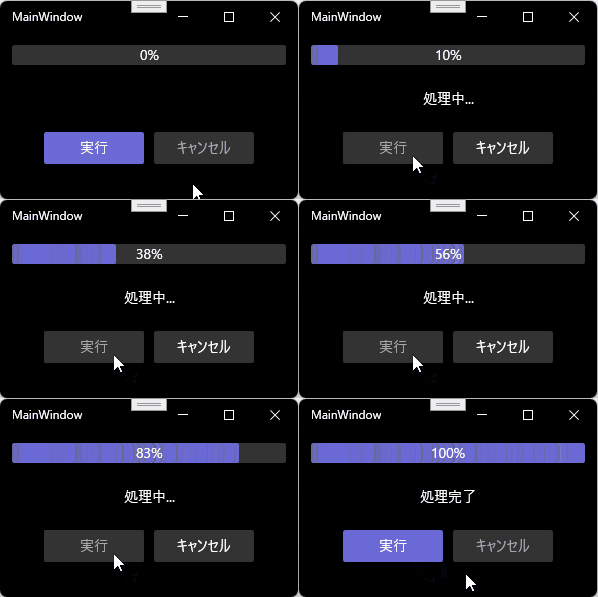
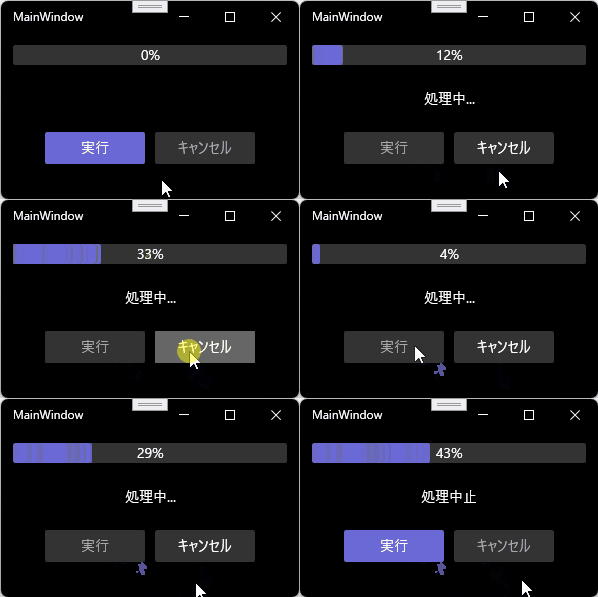
今回は[実行]ボタンを押すと進捗率が表示されて、100%になったら「処理完了」が表示されるアプリを作成します。また、処理実行中に[キャンセル]ボタンがクリックされたら、処理を途中で終了するようにします。
完成イメージは次通りです。
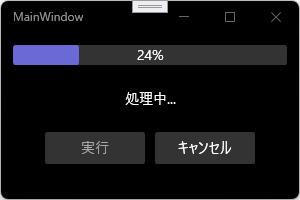
是非、参考にしてみて下さいね。
アプリの作成

アプリの開発環境と実行環境は次の通りです。
[jin_icon_information color=”#212d7a” size=”14px”] 実行環境
● Windows 11
● Visual Studio 2022(Version 17.4.2)
● WPF
● .NET 7
● ModernWpfUI(Version 0.9.4)
Visual Studio を起動して、メニューバーから[ファイル] -> [新規作成] -> [プロジェクト]の順に選択して、新規プロジェクトを作成します。
ここでは、アプリの画面をモダンな見た目にする為に「ModernWpfUI」というパッケージをインストールします。インストール手順と初期設定(App.xamlにリソース追加)は次のリンクを参照してください。
次にプロジェクトにフォルダとファイルを追加します。
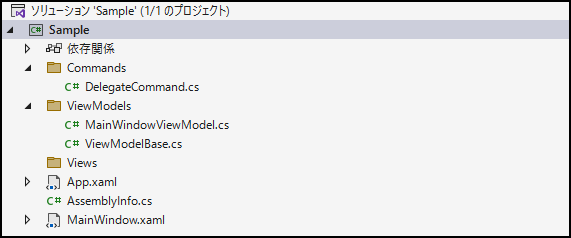
プロジェクトの直下に「Commands」と「ViewModels」を作成します。
「Commands」には「DelegateCommand.cs」という名前でクラスを作成します。「ViewModels」には「MainWindowViewModel.cs」と「ViewModelBase.cs」という名前で2つのクラスを作成します。
DelegateCommandクラスの作成
このクラスは、ICommand インターフェイスを継承したクラスにします。
このクラスについては次のリンクを参考にしてください。
ViewModelBaseクラスの作成
このクラスは INotifyPropertyChanged インターフェイスを継承したクラスにします。
INotifyPropertyChanged を実装するためのイベントハンドラと実行メソッドを記述します。
using System.ComponentModel;
using System.Runtime.CompilerServices;

namespace Sample.ViewModels
{
    public class ViewModelBase : INotifyPropertyChanged
    {
        // INotifyPropertyChanged を実装するためのイベントハンドラ
        public event PropertyChangedEventHandler PropertyChanged;

        // プロパティ名によって自動的にセットされる
        public void OnPropertyChanged([CallerMemberName] string propertyName = null) =>
            PropertyChanged?.Invoke(this, new PropertyChangedEventArgs(propertyName));
    }
}
MainWindowViewModelクラスの作成
このクラスは、ViewModelBase を継承したクラスにします。
処理中かどうかを保持する IsBusy プロパティ、進捗率を保持する PrgValue プロパティ、現在の状態をメッセージで表示する Message プロパティの3つを定義します。IsBusy プロパティの Setter にはコマンドの実行可能・不可能を切り替えるためのメソッドを仕込みます。
時間のかかる処理を実行するコマンドと実行中の処理をキャンセルするコマンドの2つを定義します。
MainWindowViewModel.cs は次のように記述します。
using Sample.Commands;
using System.Threading;
using System.Threading.Tasks;

namespace Sample.ViewModels
{
    public class MainWindowViewModel : ViewModelBase
    {
        private CancellationTokenSource cancellationTokenSource;

        private bool isBusy;
        private int prgValue;
        private string message;

        // 処理中かどうかを保持するプロパティ
        public bool IsBusy
        {
            get { return isBusy; }
            set
            {
                if (isBusy != value)
                {
                    isBusy = value;
                    RaisePropertyChanged();
                    ButtonCommand.DelegateCanExecute();
                    CancelCommand.DelegateCanExecute();
                }
            }
        }

        // 処理中かどうかを保持するプロパティ
        public int PrgValue
        {
            get { return prgValue; }
            set
            {
                if (prgValue != value)
                {
                    prgValue = value;
                    RaisePropertyChanged();
                }
            }
        }

        // メッセージを保持するプロパティ
        public string Message
        {
            get { return message; }
            set
            {
                if (message != value)
                {
                    message = value;
                    RaisePropertyChanged();
                }
            }
        }

        // ボタンの実行コマンド
        public DelegateCommand ButtonCommand { get; }

        //ボタンのキャンセルコマンド
        public DelegateCommand CancelCommand { get; }

        // コンストラクタ
        public MainWindowViewModel()
        {
            cancellationTokenSource = new CancellationTokenSource();
            ButtonCommand = new DelegateCommand(async () => await ExcuteAsync(), CanExcute);
            CancelCommand = new DelegateCommand(() => cancellationTokenSource.Cancel(), CanCancel);
        }

        // 実行コマンドの処理メソッド
        private async Task ExcuteAsync()
        {
            IsBusy= true;
            await WorkTask(cancellationTokenSource.Token);
            cancellationTokenSource = new CancellationTokenSource();
            IsBusy = false;
        }

        // 時間がかかる処理
        private async Task WorkTask(CancellationToken token)
        {
            await Task.Run(() =>
            {
                Message = "処理中...";
                for (PrgValue = 0; PrgValue < 100; PrgValue++)
                {
                    // キャンセルされたかどうかを確認
                    if (token.IsCancellationRequested)
                    {
                        Message = "処理中止";
                        return;
                    }

                    // 重たい処理
                    Thread.Sleep(100);
                }
                Message = "処理完了";
            }, token);
        }

        private bool CanExcute() => !IsBusy;

        private bool CanCancel() => IsBusy;
    }
}
MainWindow.xaml.cs
Window に ProgressBar と TextBlock と Button を配置します。TextBlock は ProgressBar の上に配置されるようにして、処理の進捗率を可視化させます。
ModernWpfUI のコントロールが Window で扱えるように、XAMLの名前空間に xmlns:ui=”http://schemas.modernwpf.com/2019″ を追加します。タグの先頭に ui があるものは、ModernWpfUI のコントロールです。
実行処理のボタンにはアクセントカラーにして、キャンセルのボタンと区別をしておきます。
MainWindow.xaml は次のように記述します。
<Window
    x:Class="Sample.MainWindow"
    xmlns="http://schemas.microsoft.com/winfx/2006/xaml/presentation"
    xmlns:x="http://schemas.microsoft.com/winfx/2006/xaml"
    xmlns:d="http://schemas.microsoft.com/expression/blend/2008"
    xmlns:mc="http://schemas.openxmlformats.org/markup-compatibility/2006"
    xmlns:ui="http://schemas.modernwpf.com/2019"
    xmlns:vm="clr-namespace:Sample.ViewModels"
    Title="MainWindow"
    Width="300"
    Height="200"
    ui:WindowHelper.UseModernWindowStyle="True">
    <Window.DataContext>
        <vm:MainWindowViewModel />
    </Window.DataContext>
    <ui:SimpleStackPanel Margin="12" Spacing="24">
        <Grid>
            <ui:ProgressBar Height="20" Value="{Binding PrgValue}" />
            <TextBlock HorizontalAlignment="Center" Text="{Binding PrgValue, StringFormat={}{0}%}" />
        </Grid>
        <TextBlock HorizontalAlignment="Center" Text="{Binding Message}" />
        <ui:SimpleStackPanel
            HorizontalAlignment="Center"
            Orientation="Horizontal"
            Spacing="10">
            <Button
                Width="100"
                HorizontalAlignment="Center"
                Command="{Binding ButtonCommand}"
                Content="実行"
                Style="{StaticResource AccentButtonStyle}" />
            <Button
                Width="100"
                HorizontalAlignment="Center"
                Command="{Binding CancelCommand}"
                Content="キャンセル" />
        </ui:SimpleStackPanel>
    </ui:SimpleStackPanel>
</Window>
コードビハインドには特に何も記述しません。
動作確認

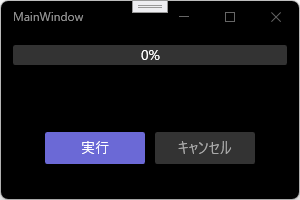
Visual Studio で実行をしてみましょう。起動したアプリが次の画面です。
まずは実行ボタンを押すと、プログレスバーが更新されて進捗率が表示されます。
処理実行中にキャンセルボタンを押すと、処理が中断されます。もう一度実行ボタンを押すと、0%から開始されます。
これでアプリケーションは完成です。
以上、最後まで読んで頂きありがとうございました。

