
「いくつかのコントロールの組み合わせを何度も表示したい」ていう時ありますよね?
そのコントロールの組み合わせをコピー&ペーストして対応することもできますが、変更が発生した場合には大変苦労することでしょう。
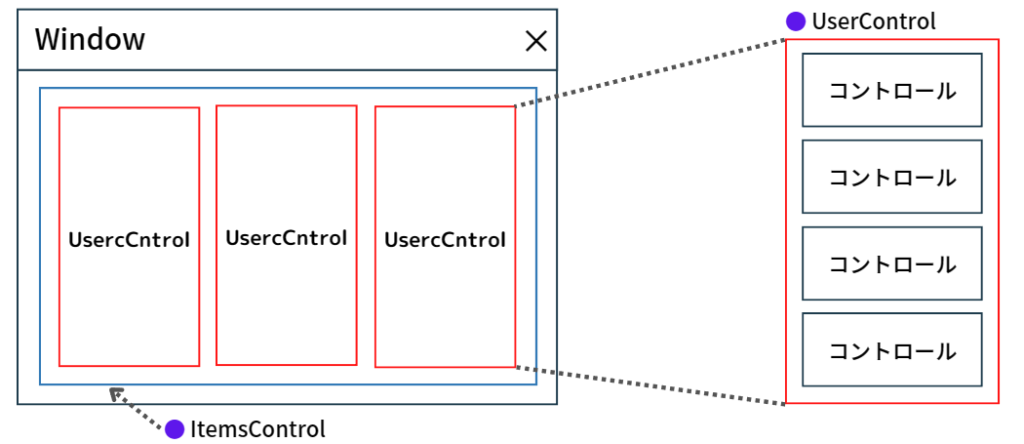
こういう場合はコントロールの組み合わせを1つの UserControl に定義して、グループ化します。そして ItemsControl を使って、UserControl を水平方向もしくは垂直方向へ並べて表示します。
この記事では、ItemsControl に UserControl を並べて表示する方法について紹介をします。是非最後まで読んでみて下さい。
ItemsControl の基本的な使い方については過去の記事を参照して下さい。

今回作成するサンプル

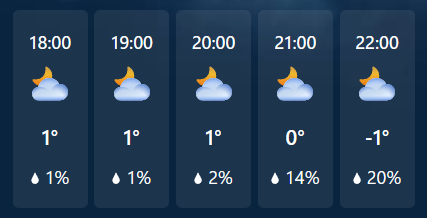
Windows のポータルサイト である MSN の1時間毎の天気予報の画面をサンプルとして作成します。
MSN で実際に表示されているのが次の画像です。
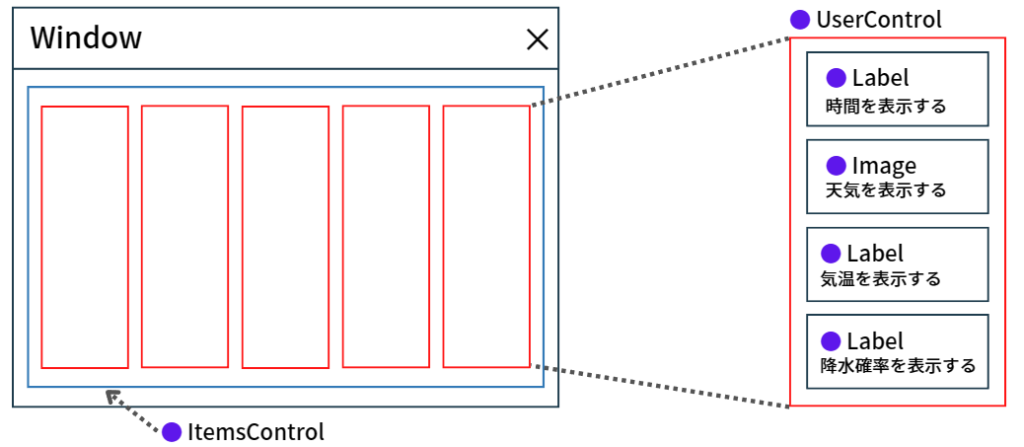
上の画像と同じような画面にするために、1時間の天気と気温、降水確率を1つの UserControl に記述して、MainWindow に UserControl を5個水平方向に並べます。
UI 画面のイメージは次の通りです。
それでは作っていきましょう。
ItemsControlにUserControlを表示

WPF は MVVM パターンによる開発が推奨されているので、このパターンを採用したソースコードを紹介したいと思います。
まずは、プロジェクトにフォルダとクラス、ユーザーコントロールを下図のように追加します。ソリューションエクスプローラーを開いて、プロジェクト名を選択後に右クリックして、右クリックメニューの中から[追加]を選ぶとフォルダとクラス、ユーザーコントロールを追加することができます。
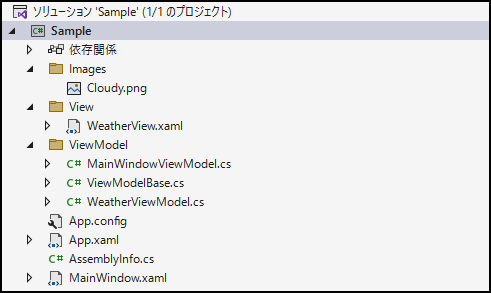
Image コントロールに表示する天気のアイコンには次の画像を使用します。プロジェクトの Images フォルダに追加しておきましょう。

UserControl.xamlとUserControlのViewModelを記述
UserControl.xaml を開いて、高さ160pxで幅が60pxの丸角の枠線を配置します。枠線の中に TextBlock を3つ、Image を1つ配置します。
3つの TextBlock で同じ設定になるプロパティ(Foreground、TextAlignment、Margin)は Resources にまとめています。また、Text プロパティには後述する WeatherViewModel のプロパティをそれぞれバインドしています。
Image は BitmapImage の UriSource プロパティに Images フォルダに保存されている Cloudy.png のパスを設定しています。
<UserControl
    x:Class="Sample.View.WeatherView"
    xmlns="http://schemas.microsoft.com/winfx/2006/xaml/presentation"
    xmlns:x="http://schemas.microsoft.com/winfx/2006/xaml"
    xmlns:d="http://schemas.microsoft.com/expression/blend/2008"
    xmlns:mc="http://schemas.openxmlformats.org/markup-compatibility/2006"
    mc:Ignorable="d">
    <UserControl.Resources>
        <Style x:Key="TextBlockStyle" TargetType="TextBlock">
            <Setter Property="Foreground" Value="White" />
            <Setter Property="TextAlignment" Value="Center" />
            <Setter Property="Margin" Value="0,5,0,5" />
        </Style>
    </UserControl.Resources>
    <Border
        Width="60"
        Height="160"
        Margin="5,0,5,0"
        Background="#1c354d"
        CornerRadius="5">
        <StackPanel Margin="0,15,0,15">
            <TextBlock Style="{StaticResource TextBlockStyle}" Text="{Binding Time, StringFormat={}{0:hh\\:mm}, ConverterCulture=ja-jP}" />
            <Image Width="40" Height="50">
                <Image.Source>
                    <BitmapImage UriSource="..\Images\Cloudy.png" />
                </Image.Source>
            </Image>
            <TextBlock Style="{StaticResource TextBlockStyle}" Text="{Binding Temperature, StringFormat={}{0}°}" />
            <TextBlock Style="{StaticResource TextBlockStyle}" Text="{Binding RainyPercent, StringFormat={}{0}%}" />
        </StackPanel>
    </Border>
</UserControl>
続いて、WeatherViewModel にプロパティを記述します。WeatherViewModel には ViewModelBase を継承します。
時間と気温と降水確率のプロパティを作成します。プロパティの setter には OnPropertyChanged メソッドを実装して、プロパティが変更された場合は値が画面へ通知されるようにしておきます。
using System;

namespace Sample.ViewModel
{
    public class WeatherViewModel : ViewModelBase
    {
        private TimeSpan time;
        private int temperature;
        private int rainyPercent;

        public TimeSpan Time
        {
            get => time;
            set { if (time != value) { time = value; OnPropertyChanged(); } }
        }

        public int Temperature
        {
            get => temperature;
            set { if (temperature != value) { temperature = value; OnPropertyChanged(); } }
        }

        public int RainyPercent
        {
            get => rainyPercent;
            set { if (rainyPercent != value) { rainyPercent = value; OnPropertyChanged(); } }
        }

        public WeatherViewModel() { }
    }
}
UserControl.xaml.cs には何も記述しません。
using System.Windows.Controls;

namespace Sample.View
{
    public partial class WeatherView : UserControl
    {
        public WeatherView()
        {
            InitializeComponent();
        }
    }
}
MainWindow.xamlとMainWindowのViewModelを記述
ItemsControl のアイテムとして UserControl を追加して表示します。表示される UserControl の数は ItemsSource にバインドされたコレクションの要素数になります。要素数が5つあるなら UserControl は5つ表示されます。
ItemsControl の ItemsSource には、UserControl の ViewModel のコレクションをバインドしています。この ViewModel と ItemsControl のアイテムに追加した UserControl を紐づけするために DataContext は バインドしています。
<Window
    x:Class="Sample.MainWindow"
    xmlns="http://schemas.microsoft.com/winfx/2006/xaml/presentation"
    xmlns:x="http://schemas.microsoft.com/winfx/2006/xaml"
    xmlns:d="http://schemas.microsoft.com/expression/blend/2008"
    xmlns:mc="http://schemas.openxmlformats.org/markup-compatibility/2006"
    xmlns:view="clr-namespace:Sample.View"
    xmlns:vm="clr-namespace:Sample.ViewModel"
    Title="MainWindow"
    Width="380"
    Height="220"
    mc:Ignorable="d">
    <Window.DataContext>
        <vm:MainWindowViewModel />
    </Window.DataContext>
    <Grid Background="#0e2843">
        <ItemsControl Margin="10" ItemsSource="{Binding Path=WeatherViewModels}">
            <ItemsControl.ItemsPanel>
                <ItemsPanelTemplate>
                    <StackPanel Orientation="Horizontal" />
                </ItemsPanelTemplate>
            </ItemsControl.ItemsPanel>
            <ItemsControl.ItemTemplate>
                <DataTemplate>
                    <view:WeatherView DataContext="{Binding}"/>
                </DataTemplate>
            </ItemsControl.ItemTemplate>
        </ItemsControl>
    </Grid>
</Window>
続いて、MainWindow にコレクションプロパティを記述します。MainWindowViewModel には ViewModelBase を継承します。
MainWindowViewModel のコンストラクタでコレクションプロパティである WeatherViewModels のインスタンス化を行い、WeatherViewModel のオブジェクトをアイテムとして5回追加します。この時、Time プロパティと Temperature プロパティと RainyPercent プロパティに値を代入して、最初に表示される値を設定しています。
using System;
using System.Collections.ObjectModel;

namespace Sample.ViewModel
{
    public class MainWindowViewModel : ViewModelBase
    {
        public ObservableCollection WeatherViewModels { set; get; }

        public MainWindowViewModel()
        {
            WeatherViewModels = new ObservableCollection();
            for (int i = 0; i < 5; i++)
            {
                WeatherViewModels.Add(new WeatherViewModel());
                WeatherViewModels[i].Time = new TimeSpan(i, 0, 0);
                WeatherViewModels[i].Temperature = 1;
                WeatherViewModels[i].RainyPercent = 20;
            }
        }
    }
}
MainWindow.xaml.cs には何も記述しません。
using System.Windows;

namespace Sample
{
    public partial class MainWindow : Window
    {
        public MainWindow()
        {
            InitializeComponent();
        }
    }
}
サンプルの動作確認
さて、ここまで出来たらプログラムを動かしてみましょう。
アプリケーションの画面は次のようになります。
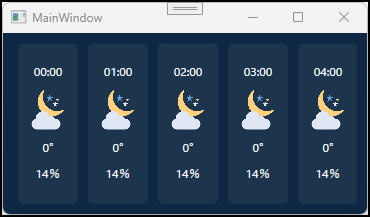
いい感じですね。時間を見ると、順番通りに左側から並べられていることが分かります。
これでやりたいことは実現できました。
まとめ
この記事では、ItemsControl に UserControl を並べて表示する方法について紹介をしました。
「いくつかのコントロールの組み合わせを何度も表示したい」場合は、その組み合わせを 1つの UserControl にまとめてしまって、ItemsControl で UserControl を表示するといいでしょう。
コントロールの組み合わせを大量に書く必要もなく、仕様の変更が発生した時に修正箇所が少なくて済むので大変便利です。
以上、最後まで読んで頂きありがとうございました。