今回はC#でポケットモンスター(ポケモン)の画像を取得するアプリを作成します。
ポケモンに関するデータを簡単に取得できる『PokeAPI』を利用することで、手軽に作ることができます。2023年1月時点で、905匹のポケモンデータが存在しています。
懐かしいポケモンから新しいポケモンまで、自作したアプリに画像を表示して楽しんでみて下さいね。
PokeAPIについて

PokeAPI とは、ポケモンに関する様々なデータが取得できる API です。ポケモンの名前やタイプ、図鑑番号、ステータス、イラストなどありとあらゆる全ての情報が集約されています。
ポケモンのデータを取得する
まずは PokeAPI へアクセスしてしましょう。
サイトを開くと「Try it now!」という文字の下に URL の入力欄があります。ここにポケモンの図鑑番号またはポケモンの名前を英語で入力すると、そのポケモンに関するデータを JSON 形式で取得できます。
ここではみんなが大好きな「ピカチュウ」の情報を取得します。ピカチュウの図鑑番号は”25”、英語の名前は”pikachu”なので、どちらかをURLの末尾に追加して[Submit]ボタンをクリックしてください。


実行した結果は次のようになります。
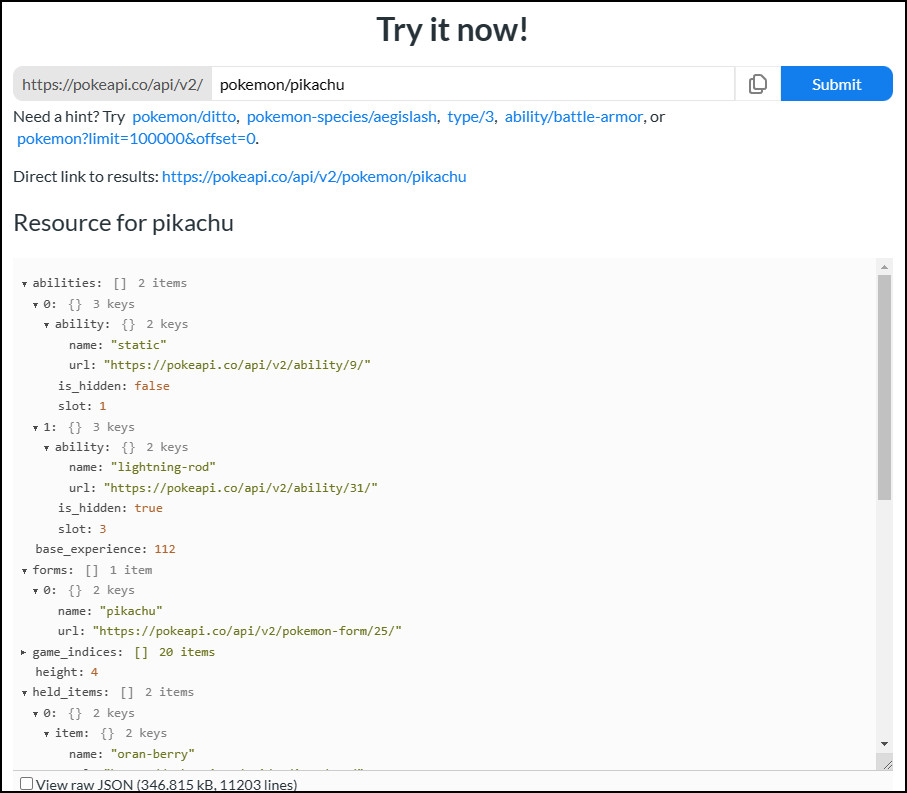
図鑑番号でも英語名でも同じ結果になりますが、ありとあらゆるデータを含んでいるので、ピカチュウの場合だとデータの容量は346KBで11203行あります。
PokeAPI はリクエストが1時間に100回までの制限があり、第8世代(剣盾)のデータまでで第9世代(SV)のデータは無いので注意しましょう。(2023年1月時点)
ポケモンの画像を取得する
ポケモンの画像を取得するには追加で API を実行する必要があります。先ほど取得したデータの中にある”sprites”に画像ファイルの URL があります。
"sprites": {
    "back_default": "https://raw.githubusercontent.com/PokeAPI/sprites/master/sprites/pokemon/back/25.png",
    "back_female": "https://raw.githubusercontent.com/PokeAPI/sprites/master/sprites/pokemon/back/female/25.png",
    "back_shiny": "https://raw.githubusercontent.com/PokeAPI/sprites/master/sprites/pokemon/back/shiny/25.png",
    "back_shiny_female": "https://raw.githubusercontent.com/PokeAPI/sprites/master/sprites/pokemon/back/shiny/female/25.png",
    "front_default": "https://raw.githubusercontent.com/PokeAPI/sprites/master/sprites/pokemon/25.png",
    "front_female": "https://raw.githubusercontent.com/PokeAPI/sprites/master/sprites/pokemon/female/25.png",
    "front_shiny": "https://raw.githubusercontent.com/PokeAPI/sprites/master/sprites/pokemon/shiny/25.png",
    "front_shiny_female": "https://raw.githubusercontent.com/PokeAPI/sprites/master/sprites/pokemon/shiny/female/25.png",
    "other": {
      "dream_world": {
        "front_default": "https://raw.githubusercontent.com/PokeAPI/sprites/master/sprites/pokemon/other/dream-world/25.svg",
        "front_female": null
      },
      "home": {
        "front_default": "https://raw.githubusercontent.com/PokeAPI/sprites/master/sprites/pokemon/other/home/25.png",
        "front_female": "https://raw.githubusercontent.com/PokeAPI/sprites/master/sprites/pokemon/other/home/female/25.png",
        "front_shiny": "https://raw.githubusercontent.com/PokeAPI/sprites/master/sprites/pokemon/other/home/shiny/25.png",
        "front_shiny_female": "https://raw.githubusercontent.com/PokeAPI/sprites/master/sprites/pokemon/other/home/shiny/female/25.png"
      },
      "official-artwork": {
        "front_default": "https://raw.githubusercontent.com/PokeAPI/sprites/master/sprites/pokemon/other/official-artwork/25.png"
      }
    },
    "versions": {
      "generation-i": {
        "red-blue": {
          "back_default": "https://raw.githubusercontent.com/PokeAPI/sprites/master/sprites/pokemon/versions/generation-i/red-blue/back/25.png",
          "back_gray": "https://raw.githubusercontent.com/PokeAPI/sprites/master/sprites/pokemon/versions/generation-i/red-blue/back/gray/25.png",
          "back_transparent": "https://raw.githubusercontent.com/PokeAPI/sprites/master/sprites/pokemon/versions/generation-i/red-blue/transparent/back/25.png",
          "front_default": "https://raw.githubusercontent.com/PokeAPI/sprites/master/sprites/pokemon/versions/generation-i/red-blue/25.png",
          "front_gray": "https://raw.githubusercontent.com/PokeAPI/sprites/master/sprites/pokemon/versions/generation-i/red-blue/gray/25.png",
          "front_transparent": "https://raw.githubusercontent.com/PokeAPI/sprites/master/sprites/pokemon/versions/generation-i/red-blue/transparent/25.png"
        },
        "yellow": {
          "back_default": "https://raw.githubusercontent.com/PokeAPI/sprites/master/sprites/pokemon/versions/generation-i/yellow/back/25.png",
          "back_gray": "https://raw.githubusercontent.com/PokeAPI/sprites/master/sprites/pokemon/versions/generation-i/yellow/back/gray/25.png",
          "back_transparent": "https://raw.githubusercontent.com/PokeAPI/sprites/master/sprites/pokemon/versions/generation-i/yellow/transparent/back/25.png",
          "front_default": "https://raw.githubusercontent.com/PokeAPI/sprites/master/sprites/pokemon/versions/generation-i/yellow/25.png",
          "front_gray": "https://raw.githubusercontent.com/PokeAPI/sprites/master/sprites/pokemon/versions/generation-i/yellow/gray/25.png",
          "front_transparent": "https://raw.githubusercontent.com/PokeAPI/sprites/master/sprites/pokemon/versions/generation-i/yellow/transparent/25.png"
        }
      },
      "generation-ii": {
        "crystal": {
          "back_default": "https://raw.githubusercontent.com/PokeAPI/sprites/master/sprites/pokemon/versions/generation-ii/crystal/back/25.png",
          "back_shiny": "https://raw.githubusercontent.com/PokeAPI/sprites/master/sprites/pokemon/versions/generation-ii/crystal/back/shiny/25.png",
          "back_shiny_transparent": "https://raw.githubusercontent.com/PokeAPI/sprites/master/sprites/pokemon/versions/generation-ii/crystal/transparent/back/shiny/25.png",
          "back_transparent": "https://raw.githubusercontent.com/PokeAPI/sprites/master/sprites/pokemon/versions/generation-ii/crystal/transparent/back/25.png",
          "front_default": "https://raw.githubusercontent.com/PokeAPI/sprites/master/sprites/pokemon/versions/generation-ii/crystal/25.png",
          "front_shiny": "https://raw.githubusercontent.com/PokeAPI/sprites/master/sprites/pokemon/versions/generation-ii/crystal/shiny/25.png",
          "front_shiny_transparent": "https://raw.githubusercontent.com/PokeAPI/sprites/master/sprites/pokemon/versions/generation-ii/crystal/transparent/shiny/25.png",
          "front_transparent": "https://raw.githubusercontent.com/PokeAPI/sprites/master/sprites/pokemon/versions/generation-ii/crystal/transparent/25.png"
        },
        "gold": {
          "back_default": "https://raw.githubusercontent.com/PokeAPI/sprites/master/sprites/pokemon/versions/generation-ii/gold/back/25.png",
          "back_shiny": "https://raw.githubusercontent.com/PokeAPI/sprites/master/sprites/pokemon/versions/generation-ii/gold/back/shiny/25.png",
          "front_default": "https://raw.githubusercontent.com/PokeAPI/sprites/master/sprites/pokemon/versions/generation-ii/gold/25.png",
          "front_shiny": "https://raw.githubusercontent.com/PokeAPI/sprites/master/sprites/pokemon/versions/generation-ii/gold/shiny/25.png",
          "front_transparent": "https://raw.githubusercontent.com/PokeAPI/sprites/master/sprites/pokemon/versions/generation-ii/gold/transparent/25.png"
        },
        "silver": {
          "back_default": "https://raw.githubusercontent.com/PokeAPI/sprites/master/sprites/pokemon/versions/generation-ii/silver/back/25.png",
          "back_shiny": "https://raw.githubusercontent.com/PokeAPI/sprites/master/sprites/pokemon/versions/generation-ii/silver/back/shiny/25.png",
          "front_default": "https://raw.githubusercontent.com/PokeAPI/sprites/master/sprites/pokemon/versions/generation-ii/silver/25.png",
          "front_shiny": "https://raw.githubusercontent.com/PokeAPI/sprites/master/sprites/pokemon/versions/generation-ii/silver/shiny/25.png",
          "front_transparent": "https://raw.githubusercontent.com/PokeAPI/sprites/master/sprites/pokemon/versions/generation-ii/silver/transparent/25.png"
        }
      },
================ 省略 ================
    }
  },
例えば、”sprites” -> “front_default”の URL をブラウザで実行すると次のようになります。
“https://raw.githubusercontent.com/PokeAPI/sprites/master/sprites/pokemon/25.png”

また、”sprites” -> “back_default”からポケモンの後ろ姿の画像も取得できます。
“https://raw.githubusercontent.com/PokeAPI/sprites/master/sprites/pokemon/back/25.png”

画像を見て頂ければ分かると思うのですが、ゲームの見た目そのままです。またシリーズ毎(第1世代、第2世代、、、等)に画像を取得することも可能です。
ポケモンの画像を取得するアプリ作成
Visual Studio を起動して、[ファイル] -> [新規作成] -> [プロジェクト]の順に選択して、WPFのテンプレートでプロジェクトを作成します。
XAMLで画面を作る
アプリの画面には、次のことができるようします。
[jin_icon_checkcircle color=”#e9546b” size=”14px”] ポケモンの図鑑番号を指定できる。
[jin_icon_checkcircle color=”#e9546b” size=”14px”] 画像をアプリに表示できる。
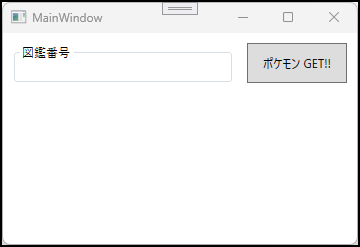
Window に TextBox と Button、Image をいい感じに配置して全体のバランスを調整します。
<Window
    x:Class="PokeApiSample.MainWindow"
    xmlns="http://schemas.microsoft.com/winfx/2006/xaml/presentation"
    xmlns:x="http://schemas.microsoft.com/winfx/2006/xaml"
    xmlns:d="http://schemas.microsoft.com/expression/blend/2008"
    xmlns:local="clr-namespace:PokeApiSample"
    xmlns:mc="http://schemas.openxmlformats.org/markup-compatibility/2006"
    Title="MainWindow"
    Width="370"
    Height="250"
    mc:Ignorable="d">
    <Grid>
        <Grid.RowDefinitions>
            <RowDefinition Height="60" />
            <RowDefinition Height="*" />
        </Grid.RowDefinitions>
        <Grid Grid.Row="0">
            <GroupBox
                Width="220"
                Height="40"
                Margin="10,10,10,0"
                HorizontalAlignment="Left"
                VerticalAlignment="Top"
                Header="図鑑番号">
                <TextBox Name="txtID" BorderThickness="0" />
            </GroupBox>
            <Button
                Width="100"
                Name="btnGetPokemon"
                Margin="10"
                HorizontalAlignment="Right"
                Click="btnGetPokemon_Click"
                Content="ポケモン GET!!" />
        </Grid>
        <Grid Grid.Row="1">
            <Image Name="imgPokemon" Margin="10" />
        </Grid>
    </Grid>
</Window>
実行すると次の画面になります。
コードを書く
C#で HTTP 要求を行うには、HttpClient クラス(System.Net.Http)を使用します。他にもHTTP要求を行うための WebClient クラスがありますが、Microsoft は HttpClient を推奨しています。
ポケモンの図鑑番号(ID)を指定した URL を、HttpClient クラスの GetAsync メソッドで要求を行います。
応答メッセージの内容は、HttpResponseMessage の Content プロパティから取得できます。ここでは、ReadAsStreamAsync メソッドを使って Stream 型で取得しています。
WPF の Image に画像を設定する場合は BitmapImage クラスのインスタンスが必要です。詳しい使い方については次のリンクを参照してみて下さい。
以上のことを踏まえて、コードを書きます。
using System.Net.Http;
using System.Threading.Tasks;
using System.Windows;
using System.Windows.Media.Imaging;

namespace PokeApiSample
{
    public partial class MainWindow : Window
    {
        private HttpClient client = new HttpClient();

        public MainWindow()
        {
            InitializeComponent();
        }


        private async void btnGetPokemon_Click(object sender, RoutedEventArgs e)
        {
            imgPokemon.Source = await GetImage(txtID.Text);
        }


        public async Task<BitmapImage> GetImage(string id)
        {
            BitmapImage bmpImage = new BitmapImage();

            var imgUri = $"https://raw.githubusercontent.com/PokeAPI/sprites/master/sprites/pokemon/{id}.png";
            var result = await client.GetAsync(imgUri);
            if (!result.IsSuccessStatusCode)
            {
                MessageBox.Show(result.StatusCode.ToString());
                return bmpImage;
            }

            using (var httpStream = await result.Content.ReadAsStreamAsync())
            {
                bmpImage.BeginInit();
                bmpImage.StreamSource = httpStream;
                bmpImage.DecodePixelWidth = 500;
                bmpImage.CacheOption = BitmapCacheOption.OnLoad;
                bmpImage.CreateOptions = BitmapCreateOptions.None;
                bmpImage.EndInit();
            }

            return bmpImage;
        }
    }
}
プログラムを実行する
ここまで完了したらアプリを起動してみましょう。
図鑑番号を1~905までの数字を入力して[ポケモン GET!!]ボタンを押すと、図鑑番号にリンクしたポケモンの画像が表示されます。
まとめ
PokeAPI を使ってポケモンの画像を取得するアプリを作成しました。
この記事ではポケモン1匹の画像だけ表示しましたが、複数匹のポケモンの画像とちょっとしたデータ(図鑑番号、名前、タイプ)を表示するアプリも作成しました。興味がある方は次のリンクから確認してみて下さいね。

PokeAPI はポケモンの高さや重さ、ステータスなどのデータも取得できるので、機会があればポケモン図鑑のようなアプリも作ってみたいなと思います。
以上、最後まで読んで頂きありがとうございました。