
今回はPokeAPIを使って、ポケモンの一覧(ポケモンカード)を表示するアプリをC#で作成します。
完成イメージは次の通りです。ポケモンの図鑑番号を入力して、[ポケモン 表示!!]ボタンをクリックすると、ポケモンカードが表示されます。
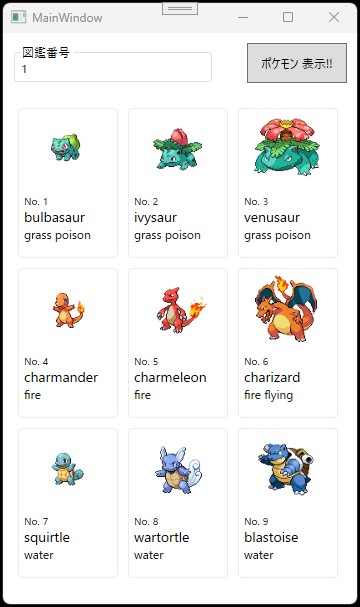
懐かしいポケモンから新しいポケモンまで、自作したアプリにポケモンカードを表示して楽しんでみて下さいね。
PokeAPIについて

PokeAPI とは、ポケモンに関する様々なデータが取得できる API です。ポケモンの名前やタイプ、図鑑番号、ステータス、イラストなどありとあらゆる全ての情報が集約されています。
ポケモンのデータを取得する
まずは PokeAPI へアクセスしてしましょう。
サイトを開くと「Try it now!」という文字の下に URL の入力欄があります。ここにポケモンの図鑑番号またはポケモンの名前を英語で入力すると、そのポケモンに関するデータを JSON 形式で取得できます。
ここではみんなが大好きな「ピカチュウ」の情報を取得します。ピカチュウの図鑑番号は”25”、英語の名前は”pikachu”なので、どちらかをURLの末尾に追加して[Submit]ボタンをクリックしてください。


実行した結果は次のようになります。
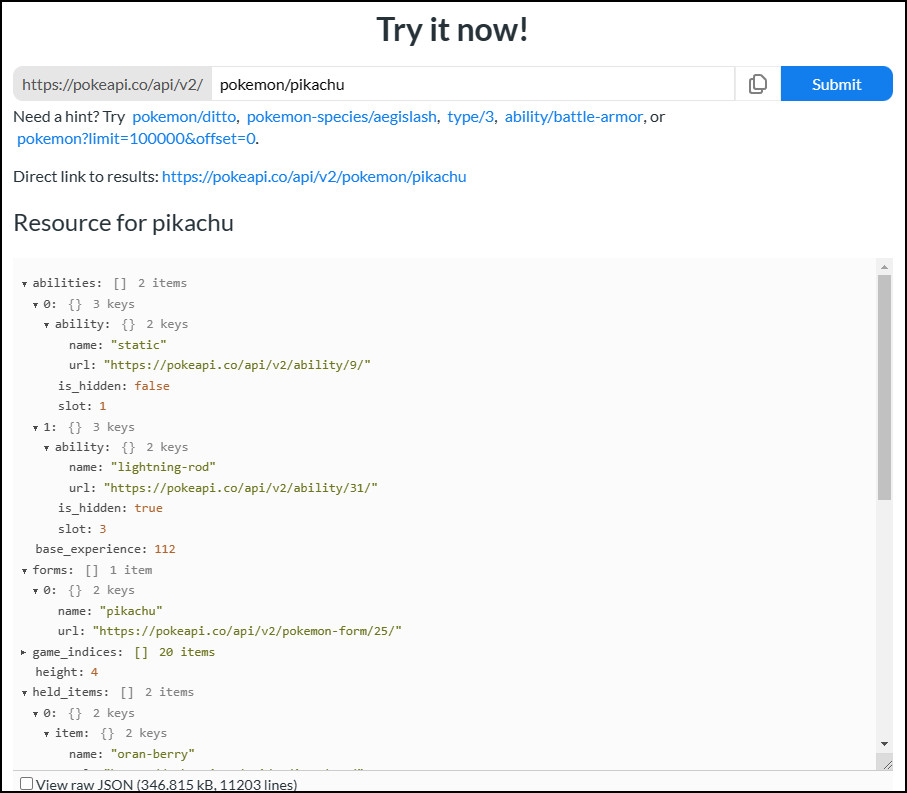
図鑑番号でも英語名でも同じ結果になりますが、ありとあらゆるデータを含んでいるので、ピカチュウの場合だとデータの容量は346KBで11203行あります。
PokeAPI はリクエストが1時間に100回までの制限があり、第8世代(剣盾)のデータまでで第9世代(SV)のデータは無いので注意しましょう。(2023年1月時点)
ポケモンの一覧を表示するアプリ作成
それではアプリを作成してみましょう。
Visual Studio を起動して、[ファイル] -> [新規作成] -> [プロジェクト]の順に選択して、WPFのテンプレートでプロジェクトを作成します。
XAMLで画面を作る
XAMLに配置するコントロールは、主に TextBox、Button、ItemsControl の3つです。
ポイントは、ItemsControl を使うという点です。
<ItemsControl … />
このコントロールは、リスト等のコレクションを決められたレイアウトで並べて表示することができます。画面にコレクションデータを一覧で表示したい場合は非常に便利です。
並べ方はどのパネルを使うかによって変わります。ItemsControl.ItemsPanel の ItemsPanelTemplate で使用するパネルを指定できます。基本は StackPanel や WrapPanel で垂直または水平方向に並べることになります。ここでは、水平方向に並べる WrapPanel を使います。
[jin_icon_checkcircle color=”#e9546b” size=”14px”]WrapPanel:水平方向にコレクションの項目を並べます。行内で収まらない場合は改行して次の行へ送ります。
作成した画面の XAML は次の通りです。
<Window
x:Class="Sample.MainWindow"
xmlns="http://schemas.microsoft.com/winfx/2006/xaml/presentation"
xmlns:x="http://schemas.microsoft.com/winfx/2006/xaml"
xmlns:d="http://schemas.microsoft.com/expression/blend/2008"
xmlns:local="clr-namespace:Sample"
xmlns:mc="http://schemas.openxmlformats.org/markup-compatibility/2006"
Title="MainWindow"
Width="370"
Height="610"
mc:Ignorable="d">
<Grid>
<Grid.RowDefinitions>
<RowDefinition Height="60" />
<RowDefinition Height="*" />
</Grid.RowDefinitions>
<Grid Grid.Row="0">
<GroupBox
Width="200"
Height="40"
Margin="10,10,10,0"
HorizontalAlignment="Left"
VerticalAlignment="Top"
Header="図鑑番号">
<TextBox Name="txtID" BorderThickness="0" />
</GroupBox>
<Button
Name="btnGetPokemon"
Width="100"
Margin="10"
HorizontalAlignment="Right"
Click="btnGetPokemon_Click"
Content="ポケモン 表示!!" />
</Grid>
<ItemsControl Margin="10" Grid.Row="1" ItemsSource="{Binding Pokemons}">
<!-- コレクション項目の表示設定 -->
<ItemsControl.ItemsPanel>
<ItemsPanelTemplate>
<!-- 項目を水平方向に並べる。行内に収まらない場合は折り返す -->
<WrapPanel Orientation="Horizontal" />
</ItemsPanelTemplate>
</ItemsControl.ItemsPanel>
<!-- コレクション項目のレイアウト設定 -->
<ItemsControl.ItemTemplate>
<DataTemplate>
<Border
Width="100"
Height="150"
Margin="5"
BorderBrush="#ECECEC"
BorderThickness="1"
CornerRadius="4">
<StackPanel Orientation="Vertical">
<Image Height="80" Source="{Binding Image}" />
<TextBlock Margin="5">
<Run FontSize="10" Text="No." />
<Run FontSize="10" Text="{Binding Id}" />
<LineBreak />
<Run FontSize="14" Text="{Binding Name}" />
<LineBreak />
<Run Text="{Binding Types[0].Type.Name}" />
<Run Text="{Binding Types[1].Type.Name}" />
</TextBlock>
</StackPanel>
</Border>
</DataTemplate>
</ItemsControl.ItemTemplate>
</ItemsControl>
</Grid>
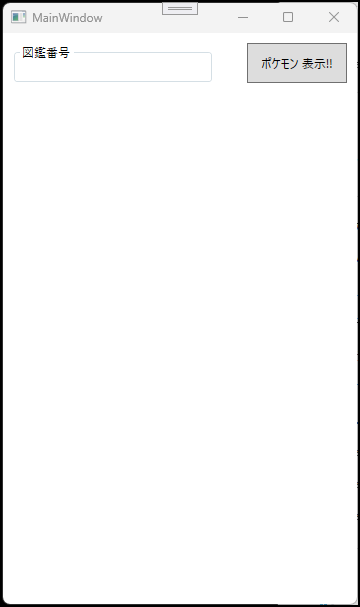
</Window>実行すると以下の画面になります。
コードを書く
pokeAPI ではポケモンのありとあらゆるデータを含んでいますが、今回は次の4つのデータだけを取り出します。
[jin_icon_checkcircle color=”#e9546b” size=”14px”] 図鑑番号
[jin_icon_checkcircle color=”#e9546b” size=”14px”] 名前
[jin_icon_checkcircle color=”#e9546b” size=”14px”] タイプ
[jin_icon_checkcircle color=”#e9546b” size=”14px”] 画像
データは JSON 形式でレスポンスが返されるので、Newtonsoft.Json というライブラリで JSON 形式のデータをクラスのオブジェクトに変換(デシリアライズ)します。
「Newtonsoft.Json の使い方」については次の記事を参考にしてみて下さい。

Pokemon クラスを作成して、各データを格納するプロパティを用意します。
using Newtonsoft.Json;
using System.Collections.Generic;
using System.Windows.Media.Imaging;

namespace Sample.Model
{
    public class Pokemon
    {
        // ポケモンの図鑑番号
        [JsonProperty("id")]
        public long Id { get; set; }

        // ポケモンの名前
        [JsonProperty("name")]
        public string Name { get; set; }

        // ポケモンのタイプ(リスト)
        [JsonProperty("types")]
        public List Types { get; set; }

        // ポケモンの画像
        public BitmapImage Image { get; set; }
    }

    public class TypeElement
    {
        // ポケモンのタイプ
        [JsonProperty("type")]
        public Species Type { get; set; }
    }

    public class Species
    {
        // ポケモンのタイプ名
        [JsonProperty("name")]
        public string Name { get; set; }
    }
}
続いて、デシリアライズしたオブジェクトを格納するコレクションをもったクラスを作成します。
WPF ではコレクションの追加や削除などの変更操作をデータバインディングできる ObservableCollection という実装クラスが提供されているので、Pokemon クラスのコレクションで使用します。
namespace Sample.ViewModel
{
    public class MainWindowViewModel
    {
        public ObservableCollection<pokemon> Pokemons { get; set; }

        public MainWindowViewModel()
        {
            Pokemons = new ObservableCollection();
        }
    }
}
次に pokeAPI からポケモンのデータを取得する関数を作成します。
この関数では図鑑番号、名前、タイプの3つのデータを取得します。画像データは後述する別の関数で取得します。
ポケモンの基本情報が取得できるURL(http://pokeapi.co/api/v2/pokemon/)に ID(図鑑番号)を加えて、HttpClient クラスの GetAsync メソッドで要求を行います。
HttpResponseMessage の content プロパティの ReadAsStringAsync メソッドで JSON 形式のデータを string 型で取得して、デシリアライズします。
/// <summary>
/// ポケモンのデータをpokeAPIから取得する
/// </summary>
/// <param name="id">ポケモンの図鑑番号</param>
/// <returns>ポケモンのデータ</returns>
public async Task<Pokemon> GetPokemon(int id)
{
    var pokemon = new Pokemon();
    var baseUrl = $"http://pokeapi.co/api/v2/pokemon/{id}/";
    var result = await client.GetAsync(baseUrl);
    if (!result.IsSuccessStatusCode)
    {
        MessageBox.Show(result.StatusCode.ToString());
        return pokemon;
    }

    try
    {
        using (var content = result.Content)
        {
            var data = await content.ReadAsStringAsync();
            if (data != null)
            {
               pokemon = JsonConvert.DeserializeObject<Pokemon>(data);
            }
        }
    }
    catch (Exception ex)
    {
        MessageBox.Show(ex.Message);
    }

    return pokemon;
}
画像データは前回の記事で紹介した関数を使用します。詳細は次のリンクを確認してみて下さい。

コードは次のようになります。
/// <summary>
/// ポケモンの画像データをpokeAPIから取得する
/// </summary>
/// <param name="id">ポケモンの図鑑番号</param>
/// <returns>ポケモンの画像データ</returns>
public async Task<BitmapImage> GetImage(int id)
{
    BitmapImage bmpImage = new BitmapImage();

    var imgUri = $"https://raw.githubusercontent.com/PokeAPI/sprites/master/sprites/pokemon/{id}.png";
    var result = await client.GetAsync(imgUri);
    if (!result.IsSuccessStatusCode)
    {
        MessageBox.Show(result.StatusCode.ToString());
        return bmpImage;
    }

    try
    {
        using (var httpStream = await result.Content.ReadAsStreamAsync())
        {
            bmpImage.BeginInit();
            bmpImage.StreamSource = httpStream;
            bmpImage.DecodePixelWidth = 500;
            bmpImage.CacheOption = BitmapCacheOption.OnLoad;
            bmpImage.CreateOptions = BitmapCreateOptions.None;
            bmpImage.EndInit();
        }
    }
    catch (Exception ex)
    {
        MessageBox.Show(ex.Message);
    }

    return bmpImage;
}
最後に MainWindow のコードビハインドに次の処理を記述します。
using System;
using System.Windows;
using System.Net.Http;
using System.Threading.Tasks;
using System.Windows.Media.Imaging;
using Newtonsoft.Json;

namespace ItemsControlSample
{
    public partial class MainWindow : Window
    {
        private HttpClient client = new HttpClient();
        private MainWindowViewModel vm = new MainWindowViewModel();

        public MainWindow()
        {
            InitializeComponent();
            this.DataContext = vm;
        }

        private async void btnGetPokemon_Click(object sender, RoutedEventArgs e)
        {
            if (txtID.Text == "") return;

            var id = int.Parse(txtID.Text);
            vm.Pokemons.Clear();

            for (int i = 0; i < 9; i++)
            {
                var pokemon = await GetPokemon(id + i);
                pokemon.Image = await GetImage(id + i);
                vm.Pokemons.Add(pokemon);
            }
        }
    }
}
これでコードは書き終わりました。お疲れ様でした(^^;)
プログラムを実行する
それではアプリを起動してみましょう。
図鑑番号に1~897まで範囲で数字を1つ入力して[ポケモン 表示!!]ボタンをクリックすると、入力された図鑑番号から順番に9匹のポケモンが表示されます。
図鑑番号に”1”を入力した場合、初代御三家の進化前・進化御が表示されます。懐かしいですね。
範囲外の数字や文字を入力するとバグるので注意しましょう(笑)
タイプに応じて背景色を変更する
応用編として、タイプ名だけだと直観的に分かりづらいので背景色も加えてみます。
画面に関連する設定はViewで完結させたいので、XAML をいじって対応します。
こういう場合に使えるのが「DataTrigger」です。Binding された値によって条件分岐ができるので、これをトリガーにして背景色を変更させます。
DataTrigger の Binding は自身の Text プロパティをバインドするように記述します。
<Window
    x:Class="ItemsControlSample.MainWindow"
    xmlns="http://schemas.microsoft.com/winfx/2006/xaml/presentation"
    xmlns:x="http://schemas.microsoft.com/winfx/2006/xaml"
    xmlns:d="http://schemas.microsoft.com/expression/blend/2008"
    xmlns:local="clr-namespace:ItemsControlSample"
    xmlns:mc="http://schemas.openxmlformats.org/markup-compatibility/2006"
    Title="MainWindow"
    Width="370"
    Height="610"
    mc:Ignorable="d">
    <Window.Resources>
        <Style x:Key="TypeBackground" TargetType="TextBlock">
            <Setter Property="Height" Value="18" />
            <Setter Property="Width" Value="40" />
            <Setter Property="Margin" Value="5,0,0,0" />
            <Setter Property="Foreground" Value="#fff" />
            <Setter Property="Background" Value="Transparent" />
            <Setter Property="TextAlignment" Value="Center" />
            <Style.Triggers>
                <DataTrigger Binding="{Binding RelativeSource={RelativeSource Self}, Path=Text}" Value="grass">
                    <Setter Property="Background" Value="LimeGreen" />
                </DataTrigger>
                <DataTrigger Binding="{Binding RelativeSource={RelativeSource Self}, Path=Text}" Value="poison">
                    <Setter Property="Background" Value="BlueViolet" />
                </DataTrigger>
                <DataTrigger Binding="{Binding RelativeSource={RelativeSource Self}, Path=Text}" Value="fire">
                    <Setter Property="Background" Value="Orange" />
                </DataTrigger>
                <DataTrigger Binding="{Binding RelativeSource={RelativeSource Self}, Path=Text}" Value="flying">
                    <Setter Property="Background" Value="SkyBlue" />
                </DataTrigger>
                <DataTrigger Binding="{Binding RelativeSource={RelativeSource Self}, Path=Text}" Value="water">
                    <Setter Property="Background" Value="RoyalBlue" />
                </DataTrigger>
            </Style.Triggers>
        </Style>
    </Window.Resources>
    <Grid>
        <Grid.RowDefinitions>
            <RowDefinition Height="60" />
            <RowDefinition Height="*" />
        </Grid.RowDefinitions>
        <Grid Grid.Row="0">
            <GroupBox
                Width="200"
                Height="40"
                Margin="10,10,10,0"
                HorizontalAlignment="Left"
                VerticalAlignment="Top"
                Header="図鑑番号">
                <TextBox Name="txtID" BorderThickness="0" />
            </GroupBox>
            <Button
                Name="btnGetPokemon"
                Width="100"
                Margin="10"
                HorizontalAlignment="Right"
                Click="btnGetPokemon_Click"
                Content="ポケモン 表示!!" />
        </Grid>
        <ItemsControl
            Grid.Row="1"
            Margin="10"
            ItemsSource="{Binding Pokemons}">
            <!--  コレクション項目の表示設定  -->
            <ItemsControl.ItemsPanel>
                <ItemsPanelTemplate>
                    <!--  項目を水平方向に並べる。行内に収まらない場合は折り返す  -->
                    <WrapPanel Orientation="Horizontal" />
                </ItemsPanelTemplate>
            </ItemsControl.ItemsPanel>

            <!--  コレクション項目のレイアウト設定  -->
            <ItemsControl.ItemTemplate>
                <DataTemplate>
                    <Border
                        Width="100"
                        Height="150"
                        Margin="5"
                        BorderBrush="#ECECEC"
                        BorderThickness="1"
                        CornerRadius="4">
                        <StackPanel Orientation="Vertical">
                            <Image Height="80" Source="{Binding Image}" />
                            <TextBlock Margin="5">
                                <Run FontSize="10" Text="No." />
                                <Run FontSize="10" Text="{Binding Id}" />
                                <LineBreak />
                                <Run FontSize="14" Text="{Binding Name}" />
                            </TextBlock>
                            <StackPanel Orientation="Horizontal">
                                <TextBlock Style="{StaticResource TypeBackground}" Text="{Binding Types[0].Type.Name}" />
                                <TextBlock Style="{StaticResource TypeBackground}" Text="{Binding Types[1].Type.Name}" />
                            </StackPanel>
                        </StackPanel>
                    </Border>
                </DataTemplate>
            </ItemsControl.ItemTemplate>
        </ItemsControl>
    </Grid>
</Window>
XAML を書き換えて実行すると次のようになります。
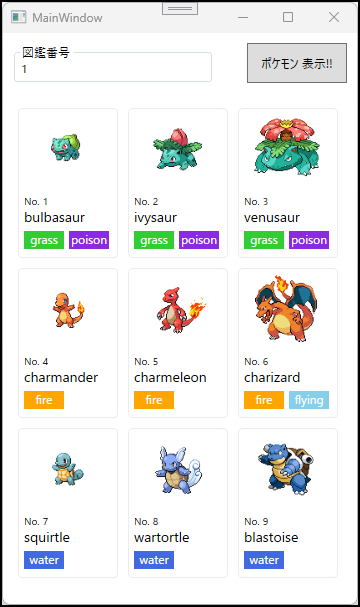
色付けすると、やっぱり分かりやすいですね。
まとめ
この記事では pokeAPI を使ってポケモンの一覧を表示するアプリを作成しました。
まだまだ pokeAPI で遊べそうなので、アプリを作成したら公開しようと思います。
以上、最後まで読んで頂きありがとうございました。