今回は、Command プロパティを持っていないコントロールに対して、コマンドを実装する方法を紹介します。
Command プロパティを持っている代表的なコントロールとして Button があります。ボタンをクリックした時の処理は、Command プロパティにバインドした ViewModel のコマンドの実行メソッドに記述できます。
一方で、Command プロパティを持っていないコントロールは、コードビハインドに記述したイベントハンドラに処理を記述することになるので、View との結合が密接になり、保守性が低くなってしまいます。

Command プロパティを持っていないコントロールで、Command を使いたい。
Command プロパティを持っていないコントロールで、Command プロパティを使うには『CommunityToolkit.Maiu』というライブラリを利用します。このライブラリのツールの1つである EventToCommandBehavior で、Event を Command で呼び出すことが可能になります。
サンプルコードなども交えて紹介していますので、ぜひ参考にしてみて下さい。
オススメの参考書
丁寧に解説された1冊。リリースされて間もない.NET MAUI の基礎が学べるので、これから Android や iOS などをターゲットとして開発するなら非常に参考になる書籍です。
CommunityToolkit.Maui とは

CommunityToolkit.Maui は、.NET MAUI でアプリ開発する時に役立つことを1つにまとめたライブラリです。ビヘイビア、コンバーターなどの汎用的な機能が揃っています。
\ 公式サイト /
Android、iOS、Windows、macOS の4つのプラットフォームに対応しており、NuGet からプロジェクトへインストールすることで利用する事ができます。
Microsoft の公式ドキュメントに使い方やサンプルが記載されているライブラリです。
EventToCommandBehavior とは

EventToCommandBehavior は、CommunityToolkit.Maui のツールの1つで、Behavior(ビヘイビア)を介して Event を Command で呼び出すことを可能にするツールです。
\ 公式サイト /
Command プロパティがサポートされていないコントロールにコマンドを実装できるので、View と View 以外のコードを分離する(疎結合)ことができます。
ちなみに、Behavior は直訳すると「振る舞い」という意味で、View の状態変化をトリガー(例えば、Button が Click されたとか)として、View で実行される処理の実装方法のことを指します。
事前準備

CommunityToolkit.Maui のインストールと設定の手順について紹介します。
ライブラリのインストール
.NET MAUI Community Toolkit を .NET MAUI のプロジェクトにインストールします。
次の手順でプロジェクトへインストールしましょう。
お使いのパソコンにインストールされている Visual Studio 2022 で、プロジェクトを開きます。
統合開発環境である Visual Studio のインストールがまだの方は、次の記事を参考にしてインストールします。

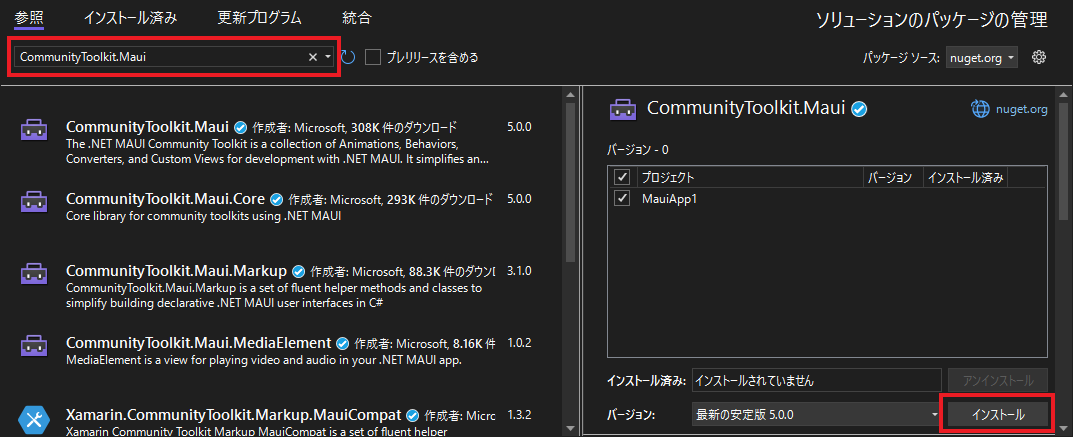
メニューバーから [ツール] -> [NuGet パッケージ マネージャー] -> [ソリューションの NuGet パッケージの管理] の順に選択します。
検索欄に「CommunityToolkit.Maui」を入力して、検索結果の一覧から「CommunityToolkit.Maui」をインストールします。(2023年5月現在、バージョンは5.1.0)
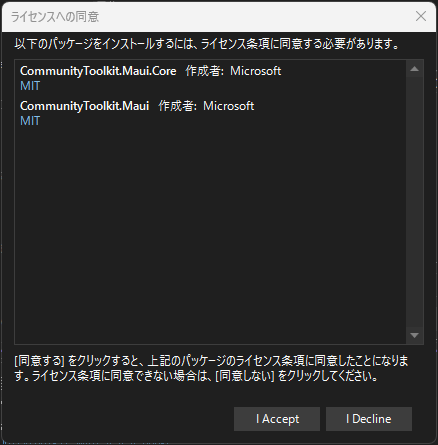
ライセンスへの同意を求める画面が表示されるので、内容を確認して [I Accept] ボタンをクリックします。
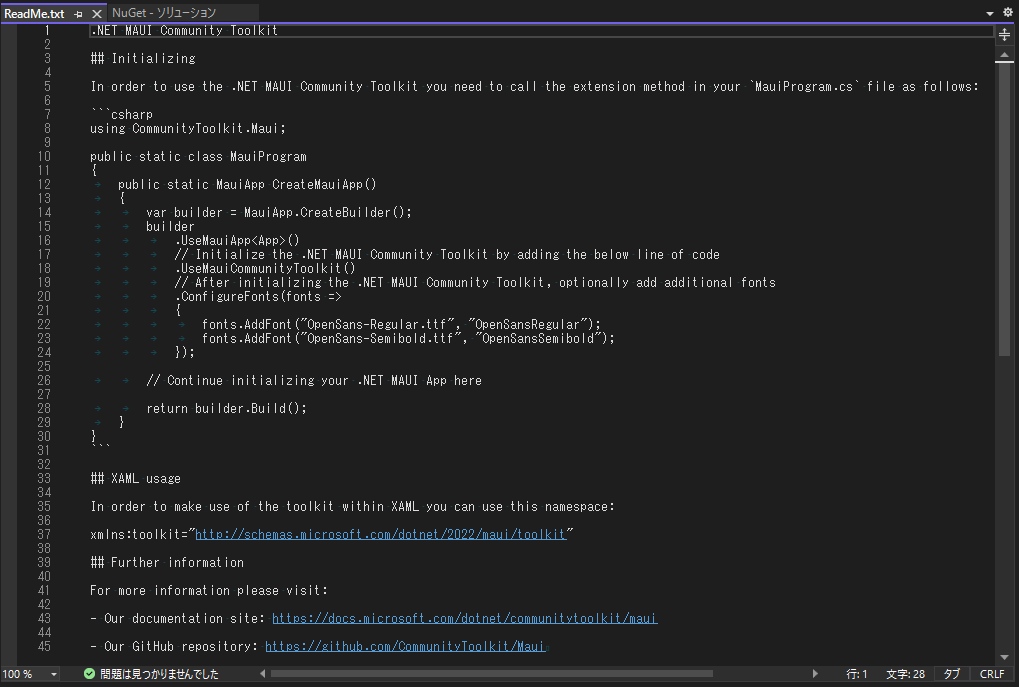
インストールが完了すると、ReadMe.txt が表示されます。このファイルにはライブラリの使い方が記載されています。
ReadMe.txt は閉じても特に問題はありません。
ライブラリの初期設定
CommunityToolkit.Maui を使うための設定があります。
次の手順でライブラリの初期設定をしましょう。
MainProgram.cs を開いて、ファイルの先頭に using ステートメントを追加します。
using CommunityToolkit.Maui;続いて、スタートアップ処理に CommunityToolkit.Maui の初期化処理を追加します。(下記コードの8行目に追加)
public static class MauiProgram
{
    public static MauiApp CreateMauiApp()
    {
        var builder = MauiApp.CreateBuilder();
        builder
            .UseMauiApp<App>()
            .UseMauiCommunityToolkit()
            .ConfigureFonts(fonts =>
            {
                fonts.AddFont("OpenSans-Regular.ttf", "OpenSansRegular");
                fonts.AddFont("OpenSans-Semibold.ttf", "OpenSansSemibold");
            });

        return builder.Build();
    }
}
これで準備は整いました。
使い方

イベントをコマンドで実装する
使い方の例として、Entry の Completed イベントをコマンドで実装できるようにします。Completed イベントはユーザーが Enter キーでテキストの入力を終了するとイベントが発生します。
まずは「ViewModels」というフォルダを作成して、そのフォルダ内に「MainViewModel.cs」を作成します。
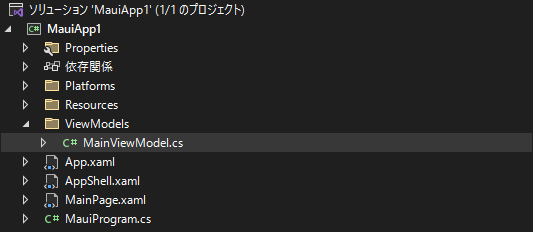
次に、MainViewModel に Command プロパティを用意します。実行処理部分には、処理が実行されたことが分かるようにデバッグログを書き出すようにします。
using System.Diagnostics;
using System.Windows.Input;

namespace MauiApp1.ViewModels
{
    public class MainViewModel
    {
        // Completed イベントのコマンド
        public ICommand CompletedCommand { private set; get; }

        public MainViewModel()
        {
            CompletedCommand = new Command(OnCompletedCommand);
        }

        private void OnCompletedCommand()
        {
            Debug.WriteLine("コマンドが実行されました");
        }
    }
}
続いて、View(MainPage.xaml)を開きます。
ファイルのヘッダー部分に CommunityToolkit.Maui の名前空間と ViewModels の名前空間を xmlns で宣言します。(下記コードの5,6行目に追加)
View と ViewModel を紐づける為に、ContentPage の BindingContext プロパティに MainViewModel を設定します。(下記コードの7,8,9行目に追加)
<ContentPage
    x:Class="MauiApp1.MainPage"
    xmlns="http://schemas.microsoft.com/dotnet/2021/maui"
    xmlns:x="http://schemas.microsoft.com/winfx/2009/xaml"
    xmlns:toolkit="http://schemas.microsoft.com/dotnet/2022/maui/toolkit"
    xmlns:viewModel="clr-namespace:MauiApp1.ViewModels"
    <ContentPage.BindingContext>
        <viewModel:MainViewModel />
    </ContentPage.BindingContext>
</ContentPage>
Entry の Behaviors に toolkit に定義されている EventToCommandBehavior をセットします。EventName プロパティには Command と関連付けるイベント名を書きます。Command には CompletedCommand をバインディングします。
<ContentPage
    x:Class="MauiApp1.MainPage"
    xmlns="http://schemas.microsoft.com/dotnet/2021/maui"
    xmlns:x="http://schemas.microsoft.com/winfx/2009/xaml"
    xmlns:toolkit="http://schemas.microsoft.com/dotnet/2022/maui/toolkit"
    xmlns:viewModel="clr-namespace:MauiApp1.ViewModels">
    <ContentPage.BindingContext>
        <viewModel:MainViewModel />
    </ContentPage.BindingContext>
    <Entry HorizontalOptions="Fill" VerticalOptions="Center">
        <Entry.Behaviors>
            <toolkit:EventToCommandBehavior Command="{Binding CompletedCommand}" EventName="Completed" />
        </Entry.Behaviors>
    </Entry>
</ContentPage>
デバッグを実行して、Entry を選択した後に Enter キーでテキストの入力を終了すると、次のデバッグログが出力されます。
コマンドが実行されました
コマンドパラメータを使用する(基本編)
コマンドで実行するメソッドにパラメータを渡したい時に使えるのが、CommandParameter プロパティです。
このプロパティは単純な文字列を ViewModel のメソッドにオブジェクト型で渡すことができます。
MainPage.xaml の CommandParameter プロパティを次のように追加します。ここでは、”パラメーター値”という文字列を渡します。
<ContentPage
    x:Class="MauiApp1.MainPage"
    xmlns="http://schemas.microsoft.com/dotnet/2021/maui"
    xmlns:x="http://schemas.microsoft.com/winfx/2009/xaml"
    xmlns:toolkit="http://schemas.microsoft.com/dotnet/2022/maui/toolkit"
    xmlns:viewModel="clr-namespace:MauiApp1.ViewModels">
    <ContentPage.BindingContext>
        <viewModel:MainViewModel />
    </ContentPage.BindingContext>
    <Entry HorizontalOptions="Fill" VerticalOptions="Center">
        <Entry.Behaviors>
            <toolkit:EventToCommandBehavior
                Command="{Binding CompletedCommand}"
                CommandParameter="パラメーター値"
                EventName="Completed" />
        </Entry.Behaviors>
    </Entry>
</ContentPage>
次に、MainViewModel の Command の実行メソッドが CommandParameter のオブジェクト型の引数を受け取れるように変更します。受け取った引数はデバッグログに出力します。
using System.Diagnostics;
using System.Windows.Input;

namespace MauiApp1.ViewModels
{
    public class MainViewModel
    {
        // Completed イベントのコマンド
        public ICommand CompletedCommand { private set; get; }

        public MainViewModel()
        {
            CompletedCommand = new Command(x => OnCompletedCommand(x));
        }

        private void OnCompletedCommand(object obj)
        {
            Debug.WriteLine(obj.ToString());
        }
    }
}
デバッグを実行して、Entry を選択した後に Enter キーでテキストの入力を終了すると、次のデバッグログが出力されます。
パラメーター値
コマンドパラメータを使用する(応用編)
コントロールのプロパティ値をコマンドの実行メソッドにパラメータとして渡すことも可能です。例えば、Entry の入力した値が格納されている Text プロパティを CommandParameter にバインディングすると、実行メソッド内で Entry の Text プロパティ値を扱った処理を行えます。
バインディングの参照先を指定するので、Entry に名前を付与し(下記コードの10行目)、EventToCommandBehavior の CommandParameter を次のように変更します(下記コードの14行目)。
<ContentPage
    x:Class="MauiApp1.MainPage"
    xmlns="http://schemas.microsoft.com/dotnet/2021/maui"
    xmlns:x="http://schemas.microsoft.com/winfx/2009/xaml"
    xmlns:toolkit="http://schemas.microsoft.com/dotnet/2022/maui/toolkit"
    xmlns:viewModel="clr-namespace:MauiApp1.ViewModels">
    <ContentPage.BindingContext>
        <viewModel:MainViewModel />
    </ContentPage.BindingContext>
    <Entry x:Name="MyEntry" HorizontalOptions="Fill" VerticalOptions="Center">
        <Entry.Behaviors>
            <toolkit:EventToCommandBehavior
                Command="{Binding CompletedCommand}"
                CommandParameter="{Binding Source={x:Reference MyEntry}, Path=Text}"
                EventName="Completed" />
        </Entry.Behaviors>
    </Entry>
</ContentPage>
ViewModel は 上述の「コマンドパラメータを使用する(基本編)」から変更はありません。
デバッグを実行して、Entry に ”バインディングしたパラメーター値” を入力して、Enter キーでテキストの入力を終了すると、次のデバッグログが出力されます。
バインディングしたパラメーター値
イベントパラメーターを使用する
EventArgs をコマンドの引数として渡す場合は、TypeArguments のディレクティブを使用して Commnad<T> のジェネリック型に EventArgs のデータを渡すことができます。ただし、EventArgs を継承したイベントデータを含むクラスしかパラメーターは渡せないので注意しましょう。
Entry は イベントデータを含まないのでイベントパラメーターを渡せないので、ここでのサンプルは ListView を使用します。ListView のアイテムを選択したら、その選択したアイテムの情報をデバッグログに出力するサンプルを紹介します。
まず、ListView に表示するデータを格納する Person クラスを定義して、Name と Age の2つのプロパティを作成します。
public class Person
{
    public string Name { get; set; }
    public int Age { get; set; }
}
ListView のアイテムを選択した時に発生するイベントは ItemTapped です。MainViewModel でコマンドを定義して、コンストラクタでは ItemTapped イベントのデータを提供する ItemTappedEventArgs を指定して、コマンドのインスタンスを生成します。
コマンドの実行メソッドの引数は ItemTappedEventArgs なので、選択された Person の Name プロパティと Age プロパティの値を取得してデバッグログに出力します。
using System.Collections.ObjectModel;
using System.Diagnostics;

namespace MauiApp1.ViewModels
{
    public class MainViewModel
    {
        // Person のコレクションを管理する
        public ObservableCollection<Person> Persons { get; set; }

        // ItemTapped イベントのコマンド
        public ICommand ItemTappedCommand { private set; get; }

        public MainViewModel()
        {
            Persons = new ObservableCollection<Person>()
            {
                new Person(){Name="田中", Age=18},
                new Person(){Name="佐藤", Age=25},
                new Person(){Name="鈴木", Age=32}
            };

            ItemTappedCommand = new Command<ItemTappedEventArgs>(x => OnItemTappedCommand(x));
        }

        private void OnItemTappedCommand(ItemTappedEventArgs arg)
        {
             var person = arg.Item as Person;
             Debug.WriteLine($"Name:{person.Name} Age:{person.Age}");
        }
    }
}
MainPage.xaml では、ListView の Behaviors に EventToCommandBehavior をセットします。EventName プロパティには ItemTapped を指定し、Command には ItemTappedCommand をバインディングします。
ここで重要な点は、TypeArguments に ItemTappedEventArgs を指定することです。これにより、コマンドに EventArgs のデータを渡すことができます。
<ContentPage
    x:Class="MauiApp1.MainPage"
    xmlns="http://schemas.microsoft.com/dotnet/2021/maui"
    xmlns:x="http://schemas.microsoft.com/winfx/2009/xaml"
    xmlns:toolkit="http://schemas.microsoft.com/dotnet/2022/maui/toolkit"
    xmlns:viewModel="clr-namespace:MauiApp1.ViewModels">
    <ContentPage.BindingContext>
        <viewModel:MainViewModel />
    </ContentPage.BindingContext>
    <ListView
        HasUnevenRows="True"
        ItemsSource="{Binding Persons}">
        <ListView.ItemTemplate>
            <DataTemplate>
                <ViewCell>
                    <HorizontalStackLayout>
                        <Label Text="{Binding Name}" />
                        <Label Text="{Binding Age}" />
                    </HorizontalStackLayout>
                </ViewCell>
            </DataTemplate>
        </ListView.ItemTemplate>
        <ListView.Behaviors>
            <toolkit:EventToCommandBehavior
                x:TypeArguments="ItemTappedEventArgs"
                Command="{Binding ItemTappedCommand}"
                EventName="ItemTapped" />
        </ListView.Behaviors>
    </ListView>
</ContentPage>
デバッグを実行すると次の画面が表示されます。
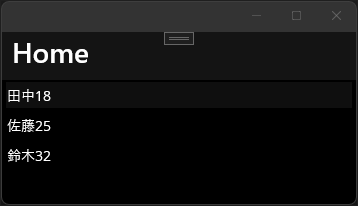
ListView に表示された最初のアイテムを選択すると、次のデバッグログが出力されます。
Name:田中 Age:18
まとめ

Command プロパティを持っていないコントロールに対して、コマンドを実装する方法を紹介しました。
Command のパラメーターを渡す方法もいくつか紹介していました。
この記事が MVVM パターンでアプリ開発をする際の参考になれば幸いです。
以上、最後まで読んで頂きありがとうございました。
