QR コードやバーコード等は、小売業や製造業の分野では人手をかけず、製品情報を記録する最適な方法として普及しています。最近では電子決済サービスの普及により、QR コードが飲食店等の店舗で活用され始めています。
これらのバーコードを C# で読み取りするには、どうしたらいいか調べた結果、『ZXing.NET』を使うのが最適だったのでご紹介したいと思います。
本記事ではバーコードが撮影された画像ファイルを ZXing.NET で解析する為の基本となる処理について記載しています。
環境
| 項目 | 内容 |
|---|---|
| OS | Windows10 |
| IDE | Visual Studio 2019 |
| フレームワーク | .NET 5.0 |
| UIフレームワーク | WPFアプリ |
オススメの参考書
C#の使い方が丁寧に解説しており、「基礎からしっかりと学びたい」という初心者の方にオススメの一冊です。サンプルコードも記載してあり、各章の最後に復習問題があるので理解度を確認しながら読み進めることができます。新しい C# のバージョンにも対応している書籍です。
ZXing.NETについて

ZXing.NET は、ゼブラクロッシングドットネットと呼びます。Java ベースの ZXing を .NET Framework 用に移植したもので、パッケージは NuGet で公開されています。
このパッケージは1次元/2次元のバーコードを生成するだけでなく、1次元/2次元のバーコードに入力された文字列を認識することも可能です。

また、オープンソースになるので Github にソースファイルが公開されています。
\ ZXing.NET のサイトへ /
バーコードの読み取りでオススメなライブラリ!!
ZXing.NETを使う方法

NuGetからパッケージをダウンロード
Microsoft Visual Studio から任意のプロジェクトを開きます。
ソリューションエクスプローラーの中にあるプロジェクト名を選択して右クリックをすると、表示される項目の中にある「NuGetパッケージの管理(N)…」をクリックします。
NuGet パッケージマネージャーが開くので、検索欄に「ZXing」と入力して検索します。検索結果一覧の中にある「ZXing.NET」を選択して、パッケージをインストールします。
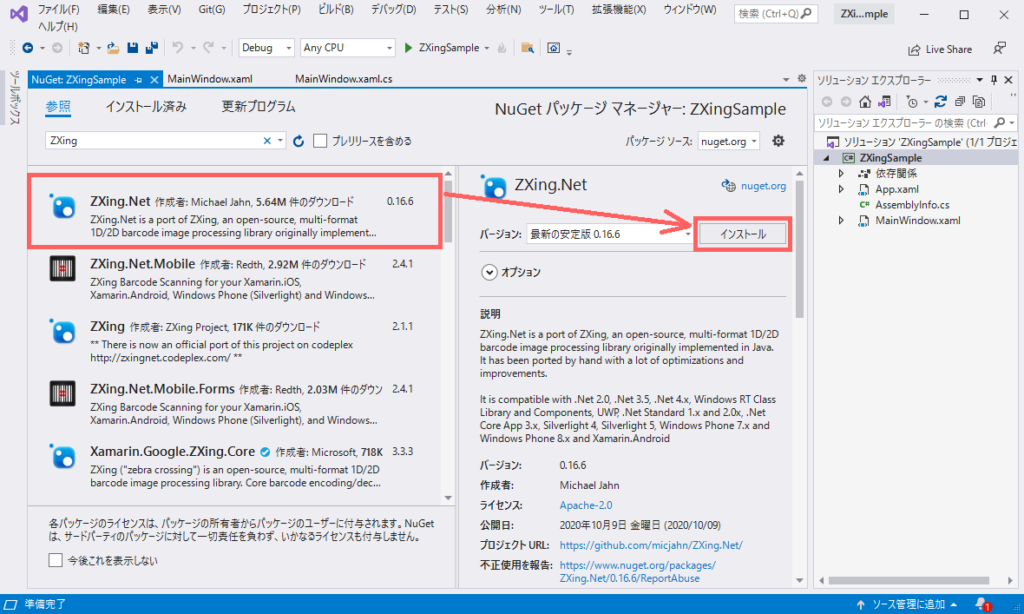
サンプル作成時にインストールした安定版のバージョンは、0.16.6でした(2021年10月現在)。
名前空間の参照先追加
続いて、異なる名前空間に定義されているクラスを使用できるように、ファイルの先頭で using ディレクティブを記述します。この記述を行うことで、コードの入力手間を省くことができます。
using ZXing;
using ZXing.Common;
using System;
using System.IO;
using System.Linq;
using System.Windows;
using System.Drawing.Imaging;
using System.Windows.Media.Imaging;
バーコードが撮影された画像データを解析する関数作成
まず、画像データを解析する関数のソースコードを以下に記述しています。こちらのサイトを参考に関数を作成させて頂きました。
private BitmapFrame BarcodeRead(string filepath, out string format, out string data)
{
    //変数の初期化
    format = data = "";
    BitmapFrame bitmapframe = null;

    //バーコードの読み取り設定
    BarcodeReader reader = new BarcodeReader()
    {
        AutoRotate = true,
        TryInverted = true
    };
    reader.Options = new DecodingOptions
    {
        TryHarder = true,
        PossibleFormats = new[] { BarcodeFormat.CODE_39 , BarcodeFormat.EAN_13 ,
                    BarcodeFormat.QR_CODE , BarcodeFormat.CODE_128, BarcodeFormat.DATA_MATRIX
                }.ToList()
    };

    using (var bmp = new Bitmap(filepath))
    {
        //画像データからバーコード読み取り
        var result = reader.Decode(bmp);

        if (result != null)
        {
            //画像ファイルにバーコードが有る場合
            format = result.BarcodeFormat.ToString().Trim();
            data = result.Text;

            //バーコード位置検出部分抽出
            Pen p = new Pen(Color.FromArgb(200, Color.Red), 18);
            using (var g = Graphics.FromImage(bmp))
            {
                g.DrawImage(bmp, 0, 0, bmp.Width, bmp.Height);

                if (format == "QR_CODE")
                {
                    int x1 = (int)result.ResultPoints[0].X;
                    int y1 = (int)result.ResultPoints[0].Y;
                    int x2 = (int)result.ResultPoints[1].X;
                    int y2 = (int)result.ResultPoints[1].Y;
                    int x3 = (int)result.ResultPoints[2].X;
                    int y3 = (int)result.ResultPoints[2].Y;
                    g.DrawLine(p, x1, y1, x2, y2);
                    g.DrawLine(p, x2, y2, x3, y3);
                }
                else if (format == "DATA_MATRIX")
                {
                    int x1 = (int)result.ResultPoints[0].X;
                    int y1 = (int)result.ResultPoints[0].Y;
                    int x2 = (int)result.ResultPoints[1].X;
                    int y2 = (int)result.ResultPoints[1].Y;
                    int x3 = (int)result.ResultPoints[2].X;
                    int y3 = (int)result.ResultPoints[2].Y;
                    int x4 = (int)result.ResultPoints[3].X;
                    int y4 = (int)result.ResultPoints[3].Y;
                    g.DrawLine(p, x1, y1, x2, y2);
                    g.DrawLine(p, x2, y2, x3, y3);
                    g.DrawLine(p, x3, y3, x4, y4);
                    g.DrawLine(p, x4, y4, x1, y1);
                }
                else
                {
                    int x1 = (int)result.ResultPoints[0].X;
                    int y1 = (int)result.ResultPoints[0].Y;
                    int x2 = (int)result.ResultPoints[1].X;
                    int y2 = (int)result.ResultPoints[1].Y;
                    g.DrawLine(p, x1, y1, x2, y2);
                }
            }

            using (Stream s = new MemoryStream())
            {
                bmp.Save(s, ImageFormat.Png);
                s.Seek(0, SeekOrigin.Begin);
                bitmapframe = BitmapFrame.Create(s, BitmapCreateOptions.None, BitmapCacheOption.OnLoad);
            }
        }
        else
        {
            //画像ファイルにバーコードが無い場合
            format = "NO BARCODE";
            data = "NO BARCODE";
        }
    }

    return bitmapframe;
}
この関数は画像データが保管されているファイルパスを渡すことで画像解析を行い、画像内にあるバーコード(QRコードやデータマトリックスを含む)の種類と読み取り結果を出力します。また、検出したバーコードの位置座標の情報を元に、赤い線を画像データに描画します。
バーコードや QR コードを解析するには、ZXing.NET のBarcodeReaderクラスのDecodeメソッドを使用します。このメソッドを使用する前にオプションの設定をすることで、読み取り精度の向上が可能になります。
- AutoRotateプロパティ:true にすると、画像を90度ずつ回転させて読み取りを試します。
- TryInvertedプロパティ:true にすると、読み取れなかったときに白黒反転させてもう一度試します。
- Optionsプロパティ:その他のオプションを設定します。
上記③のオプション設定の中でも使用するオプションは以下の通りです。
| プロパティ名 | 内容 |
|---|---|
| TryHarder | true にすると、画像をより丁寧に解析する。認識率が上がる代わりに、時間もかかる。 |
| PossibleFormats | 読み取るコードのフォーマットのリストを与える。読み取るべきコードの種類を限定することで、読み取り精度が上がる。 |
オプションの設定が完了したら、画像ファイルが保管されているファイルパスから画像データを取得し、Decodeを行います。このメソッドの戻り値がnull以外ならバーコードの解析に成功したことになります。
成功した場合は、解析結果がオブジェクトに格納されているので、以下のプロパティからデータを取得します。
- Textプロパティ:読み取りしたバーコードのデータ
- BarcodeFormatプロパティ:読み取りしたバーコードのフォーマット
- ResultPointsプロパティ:バーコードとして認識できた画像内の位置座標
バーコードの位置座標を画像データに反映させる為にResultPointsプロパティの位置情報を使って、描画を行います。
ここで注意したいのが、バーコードの種類によって取得できる位置座標の数が異なるので、QR コードとデータマトリックス、その他バーコードで分類して描画を行う必要があります。
サンプル使用例

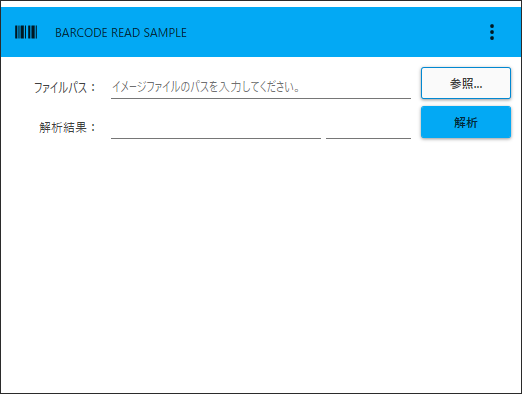
上記で説明したサンプルソースコードを使用して、WPF でバーコードを解析するアプリケーションを作成してみます。
解析する画像データのファイルパスを入力欄に入力して、解析ボタンをクリックすれば、バーコードのデータ・フォーマットと位置座標が描画された画像データが表示されます。画面はマテリアルデザインを適用させてオシャレな画面に仕上げました。
マテリアルデザインの適用方法については、以下の記事で詳しく記載しています。
XAML のソースは以下の記述になります。
<Window
    x:Class="ZXingSample.MainWindow"
    xmlns="http://schemas.microsoft.com/winfx/2006/xaml/presentation"
    xmlns:x="http://schemas.microsoft.com/winfx/2006/xaml"
    xmlns:d="http://schemas.microsoft.com/expression/blend/2008"
    xmlns:local="clr-namespace:ZXingSample"
    xmlns:materialDesign="http://materialdesigninxaml.net/winfx/xaml/themes"
    xmlns:mc="http://schemas.openxmlformats.org/markup-compatibility/2006"
    Title="MainWindow"
    Width="500"
    Height="400"
    WindowStyle="None"
    mc:Ignorable="d">
    <Grid>
        <Grid.RowDefinitions>
            <RowDefinition Height="50" />
            <RowDefinition Height="100" />
            <RowDefinition Height="*" />
        </Grid.RowDefinitions>
        <!--  ヘッダー  -->
        <materialDesign:ColorZone
            Grid.Row="0"
            Height="50"
            Padding="12"
            Mode="PrimaryMid">
            <DockPanel>
                <materialDesign:PopupBox DockPanel.Dock="Right" PlacementMode="BottomAndAlignRightEdges">
                    <ListBox>
                        <ListBoxItem Content="Close" />
                    </ListBox>
                </materialDesign:PopupBox>
                <StackPanel Orientation="Horizontal">
                    <materialDesign:PackIcon
                        Width="26"
                        Height="26"
                        Kind="Barcode" />
                    <TextBlock
                        Margin="16,0,0,0"
                        VerticalAlignment="Center"
                        Text="BARCODE READ SAMPLE" />
                </StackPanel>
            </DockPanel>
        </materialDesign:ColorZone>
        <Label
            x:Name="lblPath"
            Grid.Row="1"
            Width="92"
            Margin="10,18,0,0"
            HorizontalAlignment="Left"
            VerticalAlignment="Top"
            HorizontalContentAlignment="Right"
            Content="ファイルパス:" />
        <TextBox
            x:Name="txtPath"
            Grid.Row="1"
            Margin="110,5,110,0"
            VerticalAlignment="Top"
            materialDesign:HintAssist.Hint="イメージファイルのパスを入力してください。"
            Style="{StaticResource MaterialDesignFloatingHintTextBox}" />
        <Button
            Name="btnPath"
            Grid.Row="1"
            Width="90"
            Margin="0,10,10,0"
            HorizontalAlignment="Right"
            VerticalAlignment="Top"
            Click="btnPath_Click"
            Content="参照..."
            FontSize="12"
            Style="{StaticResource MaterialDesignPaperDarkButton}" />
        <Label
            x:Name="lblBarcodeData"
            Grid.Row="1"
            Width="92"
            Margin="10,58,0,0"
            HorizontalAlignment="Left"
            VerticalAlignment="Top"
            HorizontalContentAlignment="Right"
            Content="解析結果:" />
        <TextBox
            x:Name="txtReadData"
            Grid.Row="1"
            Margin="110,45,200,0"
            VerticalAlignment="Top"
            Style="{StaticResource MaterialDesignFloatingHintTextBox}" />
        <TextBox
            x:Name="txtReadFormat"
            Grid.Row="1"
            Width="85"
            Margin="0,45,110,0"
            VerticalAlignment="Top"
            HorizontalAlignment="Right"
            Style="{StaticResource MaterialDesignFloatingHintTextBox}" />
        <Button
            Name="btnCreate"
            Grid.Row="1"
            Width="90"
            Margin="0,49,10,0"
            HorizontalAlignment="Right"
            VerticalAlignment="Top"
            Click="btnCreate_Click"
            Content="解析"
            FontSize="12" />
        <Image
            x:Name="ImgBarcode"
            Grid.Row="2"
            Margin="10"
            HorizontalAlignment="Stretch"
            VerticalAlignment="Stretch" />
    </Grid>
</Window>
コードは以下の記述になります。
namespace ZXingSample
{
    public partial class MainWindow : Window
    {
        public MainWindow()
        {
            InitializeComponent();
        }

        private void btnCreate_Click(object sender, RoutedEventArgs e)
        {
            //バーコード読み取り処理
            ImgBarcode.Source = BarcodeRead(txtPath.Text, out string format, out string data);

            txtReadFormat.Text = format;
            txtReadData.Text = data;
        }

        private void btnPath_Click(object sender, RoutedEventArgs e)
        {
            //画像ファイルのパスを取得
            txtPath.Text = SelectPath();

            if (txtPath.Text != "")
            {
                //画像ファイルの読み込み
                ImgBarcode.Source = BitmapFrame.Create(new Uri(txtPath.Text, UriKind.Absolute), BitmapCreateOptions.None, BitmapCacheOption.OnLoad);
            }
        }

        private string SelectPath()
        {
            var path = "";

            // ダイアログのインスタンスを生成
            var dialog = new OpenFileDialog();

            // ファイルの種類を設定
            dialog.Filter = "Image File(*.bmp, *.jpg, *.png, *.tif) | *.bmp; *.jpg; *.png; *.tif | Bitmap(*.bmp) | *.bmp | Jpeg(*.jpg) | *.jpg | PNG(*.png) | *.png";

            // ダイアログを表示する
            if (dialog.ShowDialog() == true)
            {
                // 選択されたファイル名を取得
                path = dialog.FileName;
            }

            return path;
        }
    }
}
さっそくアプリケーションを動かしてみましょう。
参照ボタンから画像ファイルを選択し、解析ボタンをクリックします。下図のように画像データからバーコードのデータと種類が表示されました。
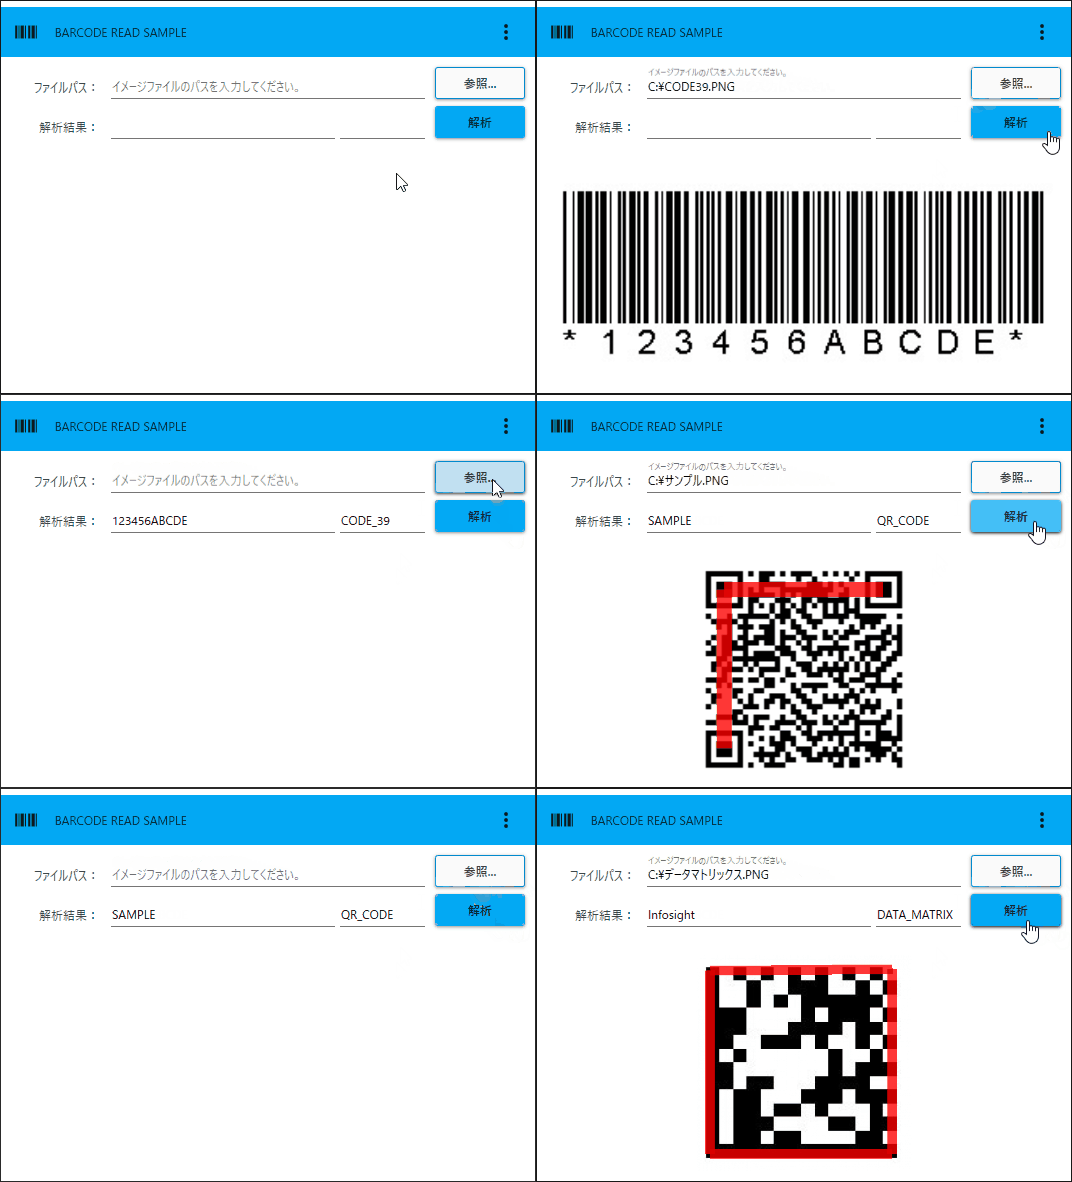
カメラで撮影した画像データも解析できましたので、是非やってみてください。
まとめ

バーコードや QR コード、データマトリックスを ZXing.NET で画像データを解析する方法について記載しました。この記事で書いた関数等を使用すれば、画像ファイルだけでなくWebカメラで撮影した画像にも応用できると思います。
今回紹介したZXing.NETは読み取りだけでなく、バーコードを作成することも可能です。作成方法については以下の記事で紹介していますので、是非参考にしてみてください。


以上、最後まで読んでいただきありがとうございました。
